iOS6新特性
一、关于内存警告
ios6中废除了viewDidUnload,viewWillUnload这两个系统回调,收到内存警告时在didReceiveMemoryWarning中进行相关的处理。
- (void)viewDidUnload {
    [super viewDidUnload];
    // 处理 ios6 以下的系统内存警告系统回调消息
}

// 这里处理ios6 的内存警告
- (void)didReceiveMemoryWarning {
    [super didReceiveMemoryWarning];

    float sysVer = [[[UIDevice currentDevice] systemVersion] floatValue];
    //ios6 的特殊处理

    if (sysVer >= 6.0f) {
        // 保证 invisible,  因为即使在当前界面也会收到系统回调
        if (self.view.window == nil) {
            //.......
            // 做相关的释放操作
            self.view = nil;   // 确保下次会重新加载
        }
    }
}
二、关于屏幕旋转
同样ios6 废除了shouldAutorotateToInterfaceOrientation这个旋转屏幕的设置接口。
必须在两个新接口中设置旋转属性:shouldAutorotate、supportedInterfaceOrientations。
收到旋转事件后的处理,同样在willRotateToInterfaceOrientation和didRotateFromInterfaceOrientation中进行。
三、UISwitch
ios6下,新增了以下几个属性,可以设置开关的颜色以及背景图。
@property (nonatomic,  retain) UIColor *tintColor;

@property (nonatomic,  retain) UIColor *thumbTintColor;

@property (nonatomic,  retain) UIImage *onImage;

@property (nonatomic,  retain) UIImage *offImage;
四、UINavigationBar
ios6新增了,设置阴影图片的属性。
@property (nonatomic, retain) UIImage *shadowImage;
五、UIImage
可以在ios6下设置图片的scale比例尺寸了。
+ (UIImage *)imageWithData:(NSData *)data scale:(CGFloat)scale;

- (id)initWithData:(NSData *)data scale:(CGFloat)scale;
六、UIRefreshControl
之前苹果官方是没有现成的下拉刷新的控件,都是自己实现或者使用比较成熟的开源库。
ios6苹果加入了UIRefreshControl,配合UITableView直接实现下拉刷新。
七、UICollectionView
全新的集合控件,应用场景有类似照片墙,瀑布流等。
iOS7新特性
一、已禁用-[UIDevice uniqueIdentifier]
苹果总是把用户的隐私看的很重要。-[UIDevice uniqueIdentifier]在iOS5实际在iOS5的时候已经被遗弃了,但是iOS7中已经完全的禁用了它。Xcode5甚至不会允许你编译包含了指引到-[UIDevice uniqueIdentifier]的app。
此外,iOS7之前的使用了-[UIDevice uniqueIdentifier] 的app如果在iOS7上运行,它不会返回设备的UUID,而是会返回一串字符串,以FFFFFFFF开头,跟着-[UIDevice identifierForVendor]的十六进制值。
二、UIPasteboard由共享变为沙盒化了
UIPasteboard过去是用来做app之间的数据分享的。UIPasteboard本无问题,但是开发者开始使用它来存储标识符,和其他的相关app分享这些标识符的时候问题就出现了。有一个使用这种把戏的就是OpenUDID。
在iOS7中,使用 +[UIPasteboard pasteboardWithName:create:]和 +[UIPasteboard pasteboardWithUniqueName]创建剪贴板,而且只对相同的app group可见,这样就让OpenUDID不那么有用了。
三、MAC地址不能再用来设别设备
还有一个生成iOS设备唯一标示符的方法是使用iOS设备的Media Access Control(MAC)地址。一个MAC地址是一个唯一的号码,它是物理网络层级方面分配给网络适配器的。这个地址苹果还有其他的名字,比如说是硬件地址(Hardware Address)或是Wifi地址,都是指同样的东西。
有很多工程和框架都使用这个方法来生成唯一的设备ID。比如说ODIN。然而,苹果并不希望有人通过MAC地址来分辨用户,所以如果你在iOS7系统上查询MAC地址,它现在只会返回02:00:00:00:00:00。
现在苹果明确的表明你应该使用-[UIDevice identifierForVendor]或是-[ASIdentifierManager advertisingIdentifier]来作为你框架和应用的唯一标示符。坦白的来说,应对这些变化也不是那么的难,见以下代码片段:
NSString *identifierForVendor = [[UIDevice currentDevice].identifierForVendor UUIDString];

NSString *identifierForAdvertising = [[ASIdentifierManager sharedManager].advertisingIdentifier UUIDString];
每种方法都适配一种特别的用法:
identifierForVendor对供应商来说是唯一的一个值,也就是说,由同一个公司发行的的app在相同的设备上运行的时候都会有这个相同的标识符。然而,如果用户删除了这个供应商的app然后再重新安装的话,这个标识符就会不一致。
advertisingIdentifier会返回给在这个设备上所有软件供应商相同的 一个值,所以只能在广告的时候使用。这个值会因为很多情况而有所变化,比如说用户初始化设备的时候便会改变。
四、iOS现在要求app如需使用麦克风,需要征得用户同意
以前如果app需要使用用户的位置,通讯录,日历,提醒以及照片,接受推送消息,使用用户的社交网络的时候需要征得用户的同意。现在在iOS7当中,使用麦克风也需要取得用户同意了。如果用户不允许app使用麦克风的话,那么需要使用麦克风的app就不能接收不到任何声音。
以下的代码是用来查询用户是否允许app使用麦克风:
//第一次调用这个方法的时候,系统会提示用户让他同意你的app获取麦克风的数据
// 其他时候调用方法的时候,则不会提醒用户
// 而会传递之前的值来要求用户同意
[[AVAudioSession sharedInstance] requestRecordPermission:^(BOOL granted) {
    if (granted) {
        // 用户同意获取数据
    } else {
        // 可以显示一个提示框告诉用户这个app没有得到允许?
    }
}];
你同时还要注意,如果你在获得用户的同意之前使用任何方法来使用麦克风的话,会引起iOS系统弹出以下警示栏:

五、[NSArray firstObject]的实现
-[NSArray firstObject]可能是Objective-C中被调用做多的API。在Open Radar上一个简单的调查显示有一些需求苹果已经做了记录。好消息是现在这些需求已经得到了解决。. firstObject的使用可以追溯到iOS4.0,但是那时仅仅是一个私有方法。在iOS7以前,工程师用下面的方式来使用它:
NSArray *arr = @[];
id item = [arr firstObject];

// 在之前你需要做以下工作
id item = [arr count] > 0 ? arr[0] : nil;
因为上面的方式很平常,有些人将它作为一个类增加到NSArray中,然后创建他们自己的firstObject方法。
这个方法的问题是这个方法的名字必须是唯一的,否则的话这个方法所引发的问题无法预估。
请确保检查你是否有任何自定义的代码在NSArray上实现了firstObject,如果有的话看看它是否是必须的,不是必须的话就把它全部移除。
六、增加了instancetype
instancetype让iOS7API变得更加难懂。苹果改变了大部分 initializer和简易构造函数(convenience constructors),用instancetype代替id作返回类型。但是这个instancetype是什么呢?
instancetype用来在声明一个方法时告诉编译器其返回类型,它表示返回调用该方法的类的对象。
这比之前返回id的通常做法要好,编译器可以对返回类型做一些检查,如果出现错误,在编译时就能提醒你,而不是在程序运行时发生崩溃。
同时,在调用子类方法时,使用它还可以省去对返回值的强制类型转换,编译器能够正确推断方法的返回值类型。
要说到instancetaype的缺点和优点吗?基本上,在任何可能的情况下都可以使用它。
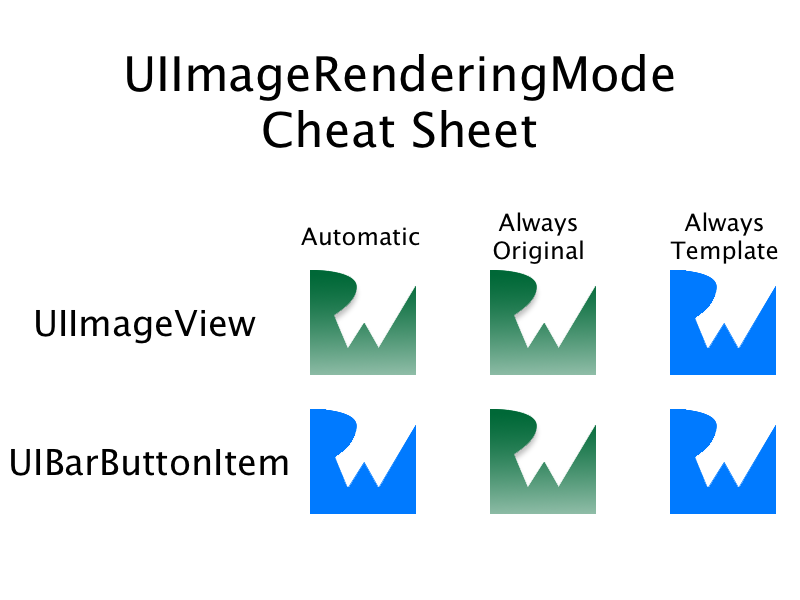
七、设置UIImage的渲染模式:UIImage.renderingMode
着色(Tint Color)是iOS7界面中的一个重大改变,你可以设置一个UIImage在渲染时是否使用当前视图的Tint Color。
UIImage新增了一个只读属性:renderingMode,对应的还有一个新增方法:imageWithRenderingMode:,它使用UIImageRenderingMode枚举值来设置图片的renderingMode属性。该枚举中包含下列值:
// 根据图片的使用环境和所处的绘图上下文自动调整渲染模式
UIImageRenderingModeAutomatic

// 始终绘制图片原始状态,不使用Tint Color
UIImageRenderingModeAlwaysOriginal

// 始终根据Tint Color绘制图片,忽略图片的颜色信息
UIImageRenderingModeAlwaysTemplate
renderingMode属性的默认值是UIImageRenderingModeAutomatic,即UIImage是否使用Tint Color取决于它显示的位置。其他情况可以看下面的图例:
以下的代码说明了使用一个既定的rendering模式创建图片是多么简单:
UIImage *img = [UIImage imageNamed:@"myimage"];

img = [img imageWithRenderingMode:UIImageRenderingModeAlwaysTemplate];
八、tintcolor VS barTintColor
iOS7中你可以使用一个给定的颜色,甚至是记入颜色主题来给整个app着色,帮助你的app脱颖而出。设置app的tint color很简答,只要使用UIView的新属性tintColor即可。
这个属性是否听上去很熟悉呢?应该很熟悉,有些类,比如说UINaviagtionBar,UISearchBar,UITabBar以及UIToolbar已经有了这么命名的属性。他们现在有了一个新的属性:barTintColor。
为了避免使用新属性的时候犯错误,如果你的appp需要支持iOS6以前的系统的时候,请检查一下。
UINavigationBar *bar = self.navigationController.navigationBar;
UIColor *color = [UIColor greenColor];

if ([bar respondsToSelector:@selector(setBarTintColor:)]) { // iOS 7+
    bar.barTintColor = color;
} else { // what year is this? 2012?
    bar.tintColor = color;
}
九、去掉了纹理颜色

纹理颜色?对,不再使用他们了,不能再创建可以展现纹理的颜色。
根据UIInterface.h文件中的注释,-[UIColor groupTableViewBackgroundColor]应该是要在iOS6当中即被删除了,但是它仅仅只是不像之前那样返回纹理颜色了。然而,以下的颜色在iOS7当中被删除了:
+ (UIColor *)viewFlipsideBackgroundColor;

+ (UIColor *)scrollViewTexturedBackgroundColor;

+ (UIColor *)underPageBackgroundColor;
十、UIButtonTypeRoundRect被UIButtonTypeSystem取代了
在iOS开发刚开始就陪伴着你的老朋友现在也被删除了,它就是UIButtonTypeRoundRect ,被新的UIButtonTypeSystem取代了。
如果每次iOS系统的发布都没有一些新的功能会是什么样子?这些新功能相信大部分开发者已经知道了,你可能会发现一些新颖的方式将它们整合到你的app中去!
十一、检查无线路由是否可用
定制一个视频播放器的能力在iOS版本每次的发布中一直有所进步。比如说,在iOS6之前,你不能在MPVolumeView中改变AirPlay的icon。
在iOS7当中,你可以通过AirPlay,蓝牙或是其他的虚线机制了解是否有一个远程的设备可用。了解它的话,就可以让你的app在恰当的时候做恰当的事,比如说,在没有远程设备的时候就不显示AirPlay的icon。
以下是新增加到MPVolumeView的新属性和推送
@property (nonatomic, readonly) BOOL wirelessRoutesAvailable; //  是否有设备可以连接的无线线路?
@property (nonatomic, readonly) BOOL wirelessRouteActive; // 设备现在是否连接上了网络
NSString *const MPVolumeViewWirelessRoutesAvailableDidChangeNotification;
NSString *const MPVolumeViewWirelessRouteActiveDidChangeNotification;
十二、了解蜂窝网络
在iOS7之前,是使用Reachability来检测设备是否连接到WWAN或是Wifi的。iOS7在这个基础上更进了一步,它会告诉你的设备连接上的是那种蜂窝网络,比如说是Edge网络,HSDPA网络,或是LTE网络。告诉用户他们连接上的是哪种网络可以优化用户体验,因为这样他们会知道网速如何,不会去请求需要高网速的网络请求。
这是CTTelephonyNetworkInfo的部分功能,它是CoreTelephony框架的一部分。iOS7还增加了currentRadioAccessTechnology属性和CTRadioAccessTechnologyDidChangeNotification到这个类。还有一些新的字符串常量来定义可能的值,比如说是CTRadioAccessTechnologyLTE。
以下代码告诉你在app delegate中如何使用这个新功能:
@import CoreTelephony.CTTelephonyNetworkInfo; // new modules syntax!
@interface AppDelegate ()
// we need to keep a reference to the CTTelephonyNetworkInfo object, otherwise the notifications won't be fired!
@property (nonatomic, strong) CTTelephonyNetworkInfo *networkInfo;
@end

@implementation ViewController

- (BOOL)application:(UIApplication *)application didFinishLaunchingWithOptions:(NSDictionary *)launchOptions {
    // whatever stuff your method does...

    self.networkInfo = [[CTTelephonyNetworkInfo alloc] init];
    NSLog(@"Initial cell connection: %@", self.networkInfo.currentRadioAccessTechnology);
    [[NSNotificationCenter defaultCenter] addObserver:self selector:@selector(radioAccessChanged) name:
     CTRadioAccessTechnologyDidChangeNotification object:nil];

    // whatever stuff your method does...
}

- (void)radioAccessChanged {
    NSLog(@"Now you're connected via %@", self.networkInfo.currentRadioAccessTechnology);
}

@end
注意:研究一下CTTelephonyNetworkInfo.h 文件来看看是否有其他无线网络类型的的字符串常量。如果设备没有连上的话,currentRadioAccessTechnology 则会返回nil。
十三、通过iCloud同步用户设备的密码
iOS7以及Mavericks增加了iCloud Keychain来提供密码,以及iCloud中一些敏感数据的同步。开发者可以通过keychain中的kSecAttrSynchronizable key来遍历dictionary对象。
由于直接处理keychain比较难,封装库提供了一个简单的处理keychain的方法。SSKeychain封装库可能是最有名的的一个,作为一种福利,现在它支持在iCloud同步。
以下代码片段显示了如何使用SSKeychain:
#import <SSKeychain.h>

- (BOOL)saveCredentials:(NSError **)error {
    SSKeychainQuery *query = [[SSKeychainQuery alloc] init];
    query.password = @"MySecretPassword";
    query.service = @"MyAwesomeService";
    query.account = @"John Doe";
    query.synchronizable = YES;
    return [query save:&error];
}

- (NSString *)savedPassword:(NSError **)error {
    SSKeychainQuery *query = [[SSKeychainQuery alloc] init];
    query.service = @"MyAwesomeService";
    query.account = @"John Doe";
    query.synchronizable = YES;
    query.password = nil;
    if ([query fetch:&error]) {
        return query.password;
    }
    return nil;
}
不要忘记CocoaPods是快速便捷安装SSKeychian的好方法。
十四、使用NSAttributedString显示HTML
在app中使用webview有时会让人非常沮丧,即使只是显示少量的HTMLneirong ,webview也会消耗大量的内存。现在iOS7让这些变得简单了,你可以从用少量代码在HTML文件中创建一个NSAttributedString,比如:
NSString *html = @"<bold>Wow!</bold> Now <em>iOS</em> can create <h3>NSAttributedString</h3> from HTMLs!";
NSDictionary *options = @{NSDocumentTypeDocumentAttribute: NSHTMLTextDocumentType};

NSAttributedString *attrString = [[NSAttributedString alloc] initWithData:[html dataUsingEncoding:NSUTF8StringEncoding] options:options documentAttributes:nil error:nil];
现在你可以在任意的UIKit对象上使用NSAttributedString 了,比如说是一个UILabel或是一个UITextField。
注意:NSHTMLTextDocumentType 只是NSDocumentTypeDocumentAttribute key一种可能的值。你还可以使用NSPlainTextDocumentType,NSRTFTextDocumentType或是NSRTFDTextDocumentType。
你还可以从NSAttributedString中创建一个HTML字符串,如下:
NSAttributedString *attrString; // from previous code
NSDictionary *options = @{NSDocumentTypeDocumentAttribute: NSHTMLTextDocumentType};

NSData *htmlData = [attrString dataFromRange:NSMakeRange(0, [attrString length]) documentAttributes:options error:nil];
NSString *htmlString = [[NSString alloc] initWithData:htmlData encoding:NSUTF8StringEncoding];
现在你估计在app中会更多的使用HTML了。
十五、使用原生的Base64
Base64是使用ASCII码显示二进制数据的一种流行方法。直到现在,开发者还不得不使用开源的工具来编码解码Base64的内容。
现在iOS7引入了以下四种新的NSData方法来操作Base64编码的数据:
// From NSData.h
- (id)initWithBase64EncodedString:(NSString *)base64String options:(NSDataBase64DecodingOptions)options;

- (NSString *)base64EncodedStringWithOptions:(NSDataBase64EncodingOptions)options;

- (id)initWithBase64EncodedData:(NSData *)base64Data options:(NSDataBase64DecodingOptions)options;

- (NSData *)base64EncodedDataWithOptions:(NSDataBase64EncodingOptions)options;
这些方法可以帮助你轻易的将NSData对象转化为Base64,或者将Base64转化为NSData object。见以下的例子:
NSData* sampleData = [@"Some sample data" dataUsingEncoding:NSUTF8StringEncoding];

NSString * base64String = [sampleData base64EncodedStringWithOptions:0];
NSLog(@"Base64-encoded string is %@", base64String); // prints "U29tZSBzYW1wbGUgZGF0YQ=="

NSData* dataFromString = [[NSData alloc] initWithBase64EncodedString:base64String options:0];
NSLog(@"String is %@",[NSString stringWithUTF8String:[dataFromString bytes]]); // prints "String is Some sample data"
如果你需要支持iOS6或者更早以前的系统,你可以使用以下两个方法:
/* These methods first appeared in NSData.h on OS X 10.9 and iOS 7.0. They are deprecated in the same releases in favor of
 the methods in the <code>NSDataBase64Encoding</code> category. However, these methods have existed for several releases, so
 they may be used for applications targeting releases prior to OS X 10.9 and iOS 7.0.
 */
- (id)initWithBase64Encoding:(NSString *)base64String;
- (NSString *)base64Encoding;
十六、使用UIApplicationUserDidTakeScreenshotNotification来检查截图
在iOS7之前,像Snapshot或是Facebook Poke这样的app是使用一些很精巧的方法来检测用户是否有截图。然而,iOS7提供一个崭新的推送方法:UIApplicationUserDidTakeScreenshotNotification。只要像往常一样订阅即可知道什么时候截图了。
注意:UIApplicationUserDidTakeScreenshotNotification 将会在截图完成之后显示。现在在截图截取之前无法得到通知。希望苹果会在iOS8当中增加UIApplicationUserWillTakeScreenshotNotification。
十七、实现多语言语音合成
如果可以让app说话会不会很好呢?iOS7加入了两个新类:AVSpeechSynthesizer 以及AVSpeechUtterance。这两个类可以给你的app发声。很有意思不是吗?有多种语言可供选择——Siri不会说的语言也有,比如说巴西葡萄牙语。
使用这两个类给app提供语言合成的功能非常简单。AVSpeechUtterance 代表你想说什么,如何说。AVSpeechSynthesizer 用来发出这些声音,见以下代码片段:
AVSpeechSynthesizer *synthesizer = [[AVSpeechSynthesizer alloc] init];
AVSpeechUtterance *utterance =
[AVSpeechUtterance speechUtteranceWithString:@"Wow, I have such a nice voice!"];
utterance.rate = AVSpeechUtteranceMaximumSpeechRate / 4.0f;
utterance.voice = [AVSpeechSynthesisVoice voiceWithLanguage:@"en-US"]; // defaults to your system language
[synthesizer speakUtterance:utterance];
十八、使用了新的UIScreenEdgePanGestureRecognizer
UIScreenEdgePanGestureRecognizer 继承自UIPanGestureRecognizer ,它可以让你从屏幕边界即可检测手势。
使用新的手势识别器很简单,见以下:
UIScreenEdgePanGestureRecognizer *recognizer = [[UIScreenEdgePanGestureRecognizer alloc] initWithTarget:self action:@selector(handleScreenEdgeRecognizer:)];
recognizer.edges = UIRectEdgeLeft;
[self.view addGestureRecognizer:recognizer];
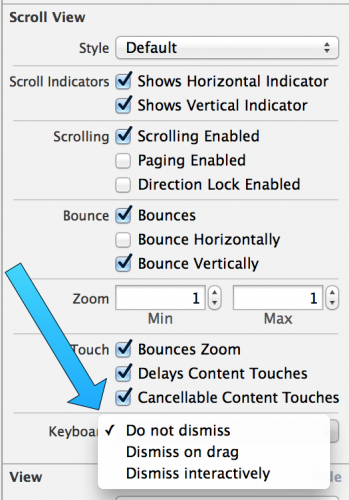
十九、使用UIScrollViewKeyboardDismissMode实现了Message app的行为
像Messages app一样在滚动的时候可以让键盘消失是一种非常好的体验。然而,将这种行为整合到你的app很难。幸运的是,苹果给UIScrollView添加了一个很好用的属性keyboardDismissMode,这样可以方便很多。
现在仅仅只需要在Storyboard中改变一个简单的属性,或者增加一行代码,你的app可以和办到和Messages app一样的事情了。
这个属性使用了新的UIScrollViewKeyboardDismissMode enum枚举类型。这个enum枚举类型可能的值如下:
UIScrollViewKeyboardDismissModeNone        // the keyboard is not dismissed automatically when scrolling
UIScrollViewKeyboardDismissModeOnDrag      // dismisses the keyboard when a drag begins
UIScrollViewKeyboardDismissModeInteractive // the keyboard follows the dragging touch off screen, and may be
pulled upward again to cancel the dismiss
以下是让键盘可以在滚动的时候消失需要设置的属性:
二十、使用Core Image来检测眨眼以及微笑
iOS给Core Image增加了两种人脸检测功能:CIDetectorEyeBlink以及CIDetectorSmile。这也就是说你现在可以在照片中检测微笑以及眨眼。
以下是在app中使用它的方法:
UIImage *image = [UIImage imageNamed:@"myImage"];
CIDetector *detector = [CIDetector detectorOfType:CIDetectorTypeFace
                                          context:nil
                                          options:@{CIDetectorAccuracy: CIDetectorAccuracyHigh}];

NSDictionary *options = @{ CIDetectorSmile: @YES, CIDetectorEyeBlink: @YES };

NSArray *features = [detector featuresInImage:image.CIImage options:options];

for (CIFaceFeature *feature in features) {
    NSLog(@"Bounds: %@", NSStringFromCGRect(feature.bounds));

    if (feature.hasSmile) {
        NSLog(@"Nice smile!");
    } else {
        NSLog(@"Why so serious?");
    }
    if (feature.leftEyeClosed || feature.rightEyeClosed) {
        NSLog(@"Open your eyes!");
    }
}
二十一、给UITextView增加了链接
现在在iOS添加你自己的Twitter账户更加简单了,现在你可以给一个NSAttributedString增加链接了,然后当它被点击的时候唤起一个定制的action。
首先,创建一个NSAttributedString然后增加给它增加一个NSLinkAttributeName 属性,见以下:
NSMutableAttributedString *attributedString = [[NSMutableAttributedString alloc] initWithString:@"This is an example by @marcelofabri_"];
[attributedString addAttribute:NSLinkAttributeName
                         value:@"username://marcelofabri_"
                         range:[[attributedString string] rangeOfString:@"@marcelofabri_"]];


NSDictionary *linkAttributes = @{NSForegroundColorAttributeName: [UIColor greenColor],
                                 NSUnderlineColorAttributeName: [UIColor lightGrayColor],
                                 NSUnderlineStyleAttributeName: @(NSUnderlinePatternSolid)};

// assume that textView is a UITextView previously created (either by code or Interface Builder)
textView.linkTextAttributes = linkAttributes; // customizes the appearance of links
textView.attributedText = attributedString;
textView.delegate = self;
这样就可以让链接在文本中显示。然而,你也可以控制当链接被点击的时候会发生什么,实现这个可以使用UITextViewDelegate协议的新的shouldInteractWithURL方法,就像这样:
- (BOOL)textView:(UITextView *)textView shouldInteractWithURL:(NSURL *)URL inRange:(NSRange)characterRange {
    if ([[URL scheme] isEqualToString:@"username"]) {
        NSString *username = [URL host];
        // do something with this username
        // ...
        return NO;
    }
    return YES; // let the system open this URL
}
iOS8新特性
一、UIAlertController对alert&actionSheet的封装
UIAlertController.h
提示框按钮的选择
typedef NS_ENUM(NSInteger, UIAlertActionStyle) {

    UIAlertActionStyleDefault = 0,

    UIAlertActionStyleCancel,

    UIAlertActionStyleDestructive

} NS_ENUM_AVAILABLE_IOS(8_0);
提示框的样式
typedef NS_ENUM(NSInteger, UIAlertControllerStyle) {

    UIAlertControllerStyleActionSheet = 0,

    UIAlertControllerStyleAlert

} NS_ENUM_AVAILABLE_IOS(8_0);

NS_CLASS_AVAILABLE_IOS(8_0) @interface UIAlertAction : NSObject <NSCopying>
创建提示框按钮
+ (instancetype)actionWithTitle:(NSString *)title style:(UIAlertActionStyle)style handler:(void (^)(UIAlertAction *action))handler;

@property (nonatomic, readonly) NSString *title;

@property (nonatomic, readonly) UIAlertActionStyle style;

@property (nonatomic, getter=isEnabled) BOOL enabled;

@end

NS_CLASS_AVAILABLE_IOS(8_0) @interface UIAlertController : UIViewController
创建提示框
+ (instancetype)alertControllerWithTitle:(NSString *)title message:(NSString *)message preferredStyle:(UIAlertControllerStyle)preferredStyle;
添加按钮
- (void)addAction:(UIAlertAction *)action;

@property (nonatomic, readonly) NSArray *actions;
添加文本输入框
- (void)addTextFieldWithConfigurationHandler:(void (^)(UITextField *textField))configurationHandler;

@property (nonatomic, readonly) NSArray *textFields;

@property (nonatomic, copy) NSString *title;

@property (nonatomic, copy) NSString *message;

@property (nonatomic, readonly) UIAlertControllerStyle preferredStyle;
简单实用示例:
// 1.创建提示框对象,默认是actionSheet效果
UIAlertController *alert = [UIAlertController alertControllerWithTitle:@"注意" message:@"我的呈现方式变了" preferredStyle:UIAlertControllerStyleAlert];

// 2.创建取消按钮并添加到提示框上
[alert addAction:[UIAlertAction actionWithTitle:@"取消" style:UIAlertActionStyleCancel handler:^(UIAlertAction *action) {

    NSLog(@"取消按钮被点击了");
}]];

// 3.呈现提示框
[self presentViewController:alert animated:YES completion:nil];
二、UIPopoverController直接通过present方式呈现
UIViewController.h
typedef NS_ENUM(NSInteger, UIModalPresentationStyle) {

    UIModalPresentationFullScreen = 0,

    UIModalPresentationPageSheet NS_ENUM_AVAILABLE_IOS(3_2),

    UIModalPresentationFormSheet NS_ENUM_AVAILABLE_IOS(3_2),

    UIModalPresentationCurrentContext NS_ENUM_AVAILABLE_IOS(3_2),

    UIModalPresentationCustom NS_ENUM_AVAILABLE_IOS(7_0),

    UIModalPresentationOverFullScreen NS_ENUM_AVAILABLE_IOS(8_0),

    UIModalPresentationOverCurrentContext NS_ENUM_AVAILABLE_IOS(8_0),

    UIModalPresentationPopover NS_ENUM_AVAILABLE_IOS(8_0),

    UIModalPresentationNone NS_ENUM_AVAILABLE_IOS(7_0) = -1,

};

@property (nonatomic,readonly) UIPopoverPresentationController *popoverPresentationController NS_AVAILABLE_IOS(8_0);
使用示例:
// 1.创建内容控制器
UITableViewController *contentVc = [[UITableViewController alloc] init];

// 2.1 设置呈现方式
contentVc.modalPresentationStyle = UIModalPresentationPopover;

// 2.2设置在导航栏的左边按钮呈现
contentVc.popoverPresentationController.barButtonItem = self.navigationItem.leftBarButtonItem;

// 3.呈现
[self presentViewController:contentVc animated:YES completion:nil];
以前的方式:
// 1.创建内容控制器
UITableViewController *contentVc = [[UITableViewController alloc] init];

// 2.创建popover
UIPopoverController *popover = [[UIPopoverController alloc] initWithContentViewController:contentVc];

popover.popoverContentSize = CGSizeMake(100, 100);

// 3.呈现
[popover presentPopoverFromBarButtonItem:self.navigationItem.leftBarButtonItem permittedArrowDirections:UIPopoverArrowDirectionAny animated:YES];
三、获取用户授权的用户隐私保护
地图定位示例 :
// 导入定位框架
#import <CoreLocation/CoreLocation.h>

@interface ViewController ()<CLLocationManagerDelegate>

// 设置定位对象
@property(nonatomic,strong)CLLocationManager* maneger;

@end

@implementation ViewController

- (void)viewDidLoad {
    [super viewDidLoad];

    // 当使用iOS8定位的时候需要请求用户授权,且在info.plist里添加字段NSLocationAlwaysUsageDescription 请求用户授权的描述
    // iOS7仅仅需要在info.plist里添加字段Privacy - Location Usage Description 请求用户授权的描述
    // 不需要再写下面的代码
    if (IOS8) {
        [self.maneger requestAlwaysAuthorization];//请求用户授权
    }

    // 开启定位
    [self.maneger startUpdatingLocation];

}
四、针对屏幕适配应运而生的size classes
size classes是为了解决storyboard只能订制一种屏幕样式的问题,它不再是具体的尺寸,而是抽象尺寸通过宽/高 的compact、any、regular 组成了九种组合包含了所有苹果设备的尺寸。
iOS9新特性
一、网络适配
iOS9系统发送的网络请求将统一使用TLS 1.2 SSL。采用TLS 1.2 协议,目的是强制增强数据访问安全,而且系统Foundation框架下的相关网络请求,将不再默认使用HTTP等不安全的网络协议,而默认采用TLS 1.2。服务器因此需要更新,以解析相关数据。如不更新,可通过在 info.plist 中声明,倒退回不安全的网络请求。
什么是SSL/TLS?跟HTTP和HTTPS有什么关系?
跟往常一样,先说结论:
HTTP + SSL/TLS + TCP = HTTPS
TLS 是 SSL 新的别称。举个例子:
“TLS1.0”之于“SSL3.1”,犹“公元2015”之于“民国104”,或者是“一千克”之于“一公斤”,或者是“半斤”之于“八两”:称呼不同,但意思相同。
SSL 3.0版本之后的迭代版本被重新命名为TLS 1.0,也就是说:
TLS 1.0 = SSL 3.1
所以他们是一个东西,我们平常也经常简单见到 “SSL/TLS” 这种说法。常用的是下面这些:
SSL 2.0

SSL 3.0

TLS 1.0 (SSL 3.1)

TLS 1.1 (SSL 3.1)

TLS 1.2 (SSL 3.1)
那为什么标题是“使用HTTPS”而没有提及SSL和TLS什么事? 要理解这个,要看下一个公式:
HTTP + SSL/TLS + TCP = HTTPS
打个比方:如果原来的 HTTP 是塑料水管,容易被戳破;那么如今新设计的 HTTPS 就像是在原有的塑料水管之外,再包一层金属水管。一来,原有的塑料水管照样运行;二来,用金属加固了之后,不容易被戳破。
目前,应用最广泛的是TLS 1.0,接下来是SSL 3.0。但是,主流浏览器都已经实现了TLS 1.2的支持。Apple让你的HTTP采用SSL/TLS协议,就是让你从HTTP转到HTTPS。
以前的HTTP不是也能用吗?为什么要用SSL/TLS,闲得慌?!Apple是不是又在反人类?
不使用SSL/TLS的HTTP通信,就是不加密的通信!
所有信息明文传播,带来了三大风险:
窃听风险(eavesdropping):第三方可以获知通信内容。
篡改风险(tampering):第三方可以修改通信内容。
冒充风险(pretending):第三方可以冒充他人身份参与通信。
SSL/TLS协议是为了解决这三大风险而设计的,希望达到:
所有信息都是加密传播,第三方无法窃听。
具有校验机制,一旦被篡改,通信双方会立刻发现。
配备身份证书,防止身份被冒充。
如何适配?---弱弱地问下:加班要多久?
正如文章开头所说:
TLS 1.2 协议 强制增强数据访问安全 系统 Foundation 框架下的相关网络请求,将不再默认使用 HTTP 等不安全的网络协议,而默认采用 TLS 1.2。服务器因此需要更新,以解析相关数据。如不更新,可通过在 Info.plist 中声明,倒退回不安全的网络请求。
方案一:立即让公司的服务端升级使用TLS 1.2。
方案二:虽Apple不建议,但可通过在 Info.plist 中声明,倒退回不安全的网络请求依然能让App访问指定http,甚至任意的http。
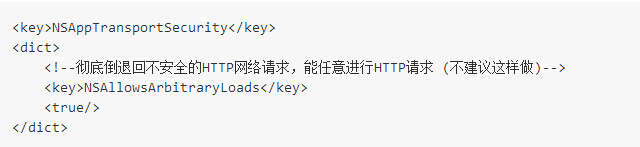
info.plist 配置中的XML源码如下所示:
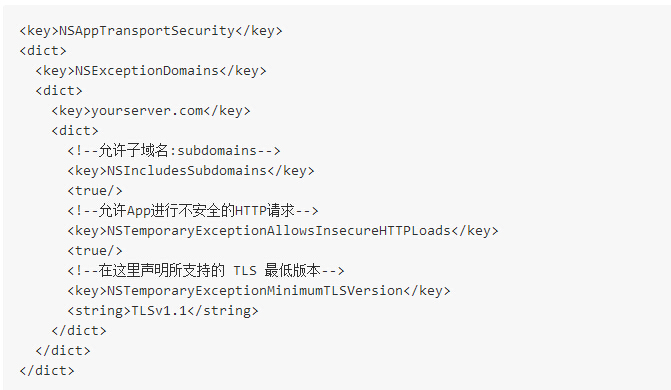
上面是比较严谨的做法,指定了能访问哪些特定的HTTP。当然也有暴力的做法: 彻底倒退回不安全的HTTP网络请求,能任意进行HTTP请求,比如你在开发一款浏览器App,或者你想偷懒,或者后台想偷懒,或者公司不给你升级服务器。但目前Apple的官方文档并未提及如何在 info.plist 配置可以参考本文:https://blog.6ag.cn/1065.html
二、更灵活的后台定位
如果不适配iOS9,就不能偷偷在后台定位。不过苹果将允许出现这种场景:
同一App中的多个location manager,一些只能在前台定位,另一些可在后台定位,并可随时开启或者关闭特定location manager的后台定位。
如何偷偷在后台定位:
// 1. 实例化定位管理器
_locationManager = [[CLLocationManager alloc] init];

// 2. 设置代理
_locationManager.delegate = self;

// 3. 定位精度
[_locationManager setDesiredAccuracy:kCLLocationAccuracyBest];

// 4.请求用户权限:分为:?只在前台开启定位?在后台也可定位,
//注意:建议只请求?和?中的一个,如果两个权限都需要,只请求?即可,
//??这样的顺序,将导致bug:第一次启动程序后,系统将只请求?的权限,?的权限系统不会请求,只会在下一次启动应用时请求?
if ([[[UIDevice currentDevice] systemVersion] floatValue] >= 8) {
    //[_locationManager requestWhenInUseAuthorization];//?只在前台开启定位
    [_locationManager requestAlwaysAuthorization];//?在后台也可定位
}

// 5.iOS9新特性:将允许出现这种场景:同一app中多个location manager:一些只能在前台定位,另一些可在后台定位(并可随时禁止其后台定位)。
if ([[[UIDevice currentDevice] systemVersion] floatValue] >= 9) {
    _locationManager.allowsBackgroundLocationUpdates = YES;
}

// 6. 更新用户位置
[_locationManager startUpdatingLocation];
但是如果照着这种方式尝试,而没有配置info.plist,100%你的程序会崩溃掉,并报错:
*** Assertion failure in -[CLLocationManager setAllowsBackgroundLocationUpdates:], /BuildRoot/Library/Caches/com.apple.xbs/Sources/CoreLocationFramework_Sim/CoreLocation-1808.1.5/Framework/CoreLocation/CLLocationManager.m:593
要将 info.plist 配置如下:

对应的 Info.plist 的XML源码是:
三、Bitcode
bitcode的理解应该是把程序编译成的一种过渡代码,然后苹果再把这个过渡代码编译成可执行的程序。bitcode也允许苹果在后期重新优化我们程序的二进制文件,有类似于App瘦身的思想。未来Watch应用须包含Bitcode,iOS不强制,但Xcode7默认会开启Bitcode。
用了xcode7的编译器编译之前没问题的项目可能会出现下列报错。
XXXX’ does not contain bitcode. You must rebuild it with bitcode enabled (Xcode setting ENABLE_BITCODE), obtain an updated library from the vendor, or disable bitcodeforthistarget.forarchitecture arm64
问题的原因是:某些第三方库还不支持bitcode。要不然是等待库的开发者升级了此项功能我们更新库,要不就是把这个bitcode禁用。禁用Bitcode,方法见下图:

四、企业级分发
iOS9之前,企业级分发十分方便:点击App出现“信任按钮”。
iOS9以后,企业级分发ipa包将遭到与Mac上dmg安装包一样的待遇。默认不能安装,也不再出现“信任按钮”,必须让用户进行gif图中的设置。
五、URL scheme
URL scheme一般使用的场景是应用程序有分享或跳其他平台授权的功能,分享或授权后再跳回来。在iOS8并没有做过多限制,在iOS9中,如果使用URL scheme必须在"info.plist"中将你要在外部调用的URL scheme列为白名单,否则不能使用。
canOpenURL: failedforURL :"<a href="http://www.cnblogs.com/dsxniubility/p/mqzone://qqapp">mqzone://qqapp</a>"- error:"This app is not allowed to query for scheme mqzone"
具体的解决方案也是要在info.plist中设置 LSApplicationQueriesSchemes 类型为数组,下面添加所有你用到的scheme

推荐一篇博客: http://awkwardhare.com/post/121196006730/quick-take-on-ios-9-url-scheme-changes
其中最关键的是以下部分:
If you call the “canOpenURL” method on a URL that is not in your whitelist, it will return “NO”, even if there is an app installed that has registered to handle this scheme. A “This app is not allowed to query for scheme xxx” syslog entry will appear.
If you call the “openURL” method on a URL that is not in your whitelist, it will fail silently. A “This app is not allowed to query for scheme xxx” syslog entry will appear.
六、新字体
iOS8中,字体是Helvetica,中文的字体有点类似于“华文细黑”。只是苹果手机自带渲染,所以看上去可能比普通的华文细黑要美观。iOS9中,中文系统字体变为了专为中国设计的“苹方” 有点类似于一种word字体“幼圆”。字体有轻微的加粗效果,并且最关键的是字体间隙变大了!
所以很多原本写死了width的label可能会出现“...”的情况。
上面这两张图也可以直观的看出同一个界面,同一个label的变化。
所以为了在界面显示上不出错,就算是固定长度的文字也还是建议使用sizetofit 或者ios向上取整 ceilf() 或者提前计算。
CGSize size = [title sizeWithAttributes:@{NSFontAttributeName: [UIFont systemFontOfSize:14.0f]}];
CGSize adjustedSize = CGSizeMake(ceilf(size.width), ceilf(size.height));
七、tableview
虽然现在的iOS9已经推送正式版了,但是iOS9使用时还是会感觉到App比以前更加卡顿了,tableView拖动时卡顿显示的最为明显。 并且之前遇到一个bug,原本好的项目用xcode7一编译,tableView刷新出了问题 ,[tableView reloadData]无效,有一行cell明明改变了但是刷新不出来。 感觉可能是这个方法和某种新加的特性冲突了,猜测可能是reloadData的操作被推迟到下一个RunLoop执行最终失效。
解决的方法是,注释[tableView reloadData],改用局部刷新,问题居然就解决了。
[self.tableView reloadSections:[NSIndexSet indexSetWithIndex:0] withRowAnimation:UITableViewRowAnimationNone];
八、iPad适配Slide Over 和 Split View
iPad适配Slide Over 和 Split View,若想适配multi tasking特性,唯一的建议:
弃纯代码,改用storyboard、xib,纵观苹果WWDC所有Demo均是如此。
- Mysteries of Auto Layout, Part 1
- What's New in Storyboards
- Implementing UI Designs in Interface Builder
- Getting Started with Multitasking on iPad in iOS 9
- Optimizing Your App for Multitasking on iPad in iOS
本文部分内容来自网络整理,如有错误请留言指出,谢谢!