

环境配置
安装 ldid 包,用于 theos 项目的签名:
brew install ldid安装 fakeroot 包:
brew install fakeroot安装 dpkg 包:
brew install dpkg锁定 dpkg 包:
brew pin dpkg安装 Theos:
sudo git clone --recursive https://github.com/theos/theos.git /opt/theos权限:
sudo chown -R $(id -u):$(id -g) /opt/theos环境变量:
export THEOS=/opt/theos
export PATH=/opt/theos/bin/:$PATH
export THEOS_DEVICE_IP=127.0.0.1
export THEOS_DEVICE_PORT=2222
创建项目
在终端使用下面命令开始创建项目:
nic.plNIC 2.0 - New Instance Creator
------------------------------
[1.] iphone/activator_event
[2.] iphone/activator_listener
[3.] iphone/application_modern
[4.] iphone/application_swift
[5.] iphone/cydget
[6.] iphone/flipswitch_switch
[7.] iphone/framework
[8.] iphone/library
[9.] iphone/notification_center_widget
[10.] iphone/notification_center_widget-7up
[11.] iphone/preference_bundle_modern
[12.] iphone/theme
[13.] iphone/tool
[14.] iphone/tool_swift
[15.] iphone/tweak
[16.] iphone/tweak_with_simple_preferences
[17.] iphone/xpc_service
Choose a Template (required): 15 # 项目模板
Project Name (required): EffortsTweak # 项目名
Package Name [com.yourcompany.effortstweak]: cn.liuag.effortstweak # 项目包名
Author/Maintainer Name [feng]: # 作者
[iphone/tweak] MobileSubstrate Bundle filter [com.apple.springboard]: com.yingxiong.bense.fqhyxs # 需要注入的宿主程序包名
[iphone/tweak] List of applications to terminate upon installation (space-separated, '-' for none) [SpringBoard]: # 宿主进程名称
Instantiating iphone/tweak in effortstweak/...
Done.项目结构:
EffortsTweak.plist  # 注入的宿主程序包名配置文件
Makefile            # make文件
Tweak.x             # 源码文件,x格式支持Objective-C语法,xm格式文件支持Objectvie-C++语法
control             # 控制文件,保存项目的配置信息
在 Makefile 文件顶部加上安装设备的IP和端口,我这里是通过USB连接,所以IP是本地。如果是WiFi连接,则应该为手机WiFi的IP地址和22端口(如果已经配置到环境变量中,则这一步可以省略):
export THEOS_DEVICE_IP=127.0.0.1
export THEOS_DEVICE_PORT=2222
开发流程
开发运行的过程
- 通过 Theos 创建一个 Tweak 项目,在项目中编写 logos 代码。
make命令将.x文件编译生成动态库文件,位置:./.theos/obj/debug/cpu架构/xxx.dylib。make package命令将xxx.dylib、xxx.plist进行打包,生成deb包。make package debug=0命令是打包 release 版本的deb包。make install命令将 deb 拷贝到手机上,并通过 Cydia 安装。- 安装:Cydia 会将 deb 解压,并将
xxx.dylib和xxx.plist拷贝到/Library/MobileSubstrate/DynamicLibraries路径下完成安装。如果还有其他资源文件,也会拷贝到指定的路径。 - 卸载:通过 Cydia 进行卸载,会删除安装的所有文件。
make clean命令可以清理编译生成的文件。
deb 包
使用 make package 会在项目目录下面生成 package 文件夹,里面包含了 deb 包。
deb 包本质上就是一种特殊格式的压缩包,解压里面的内容,可以看到 Library 的目录结构和安装到 iPhone 上对应文件目录结构是一致的,是一种映射关系。
简单来说,安装 deb 包就是一个解压操作而已,把 deb 包中的内容解压到 iPhone 就完成了安装流程。
deb 包安装后的路径:
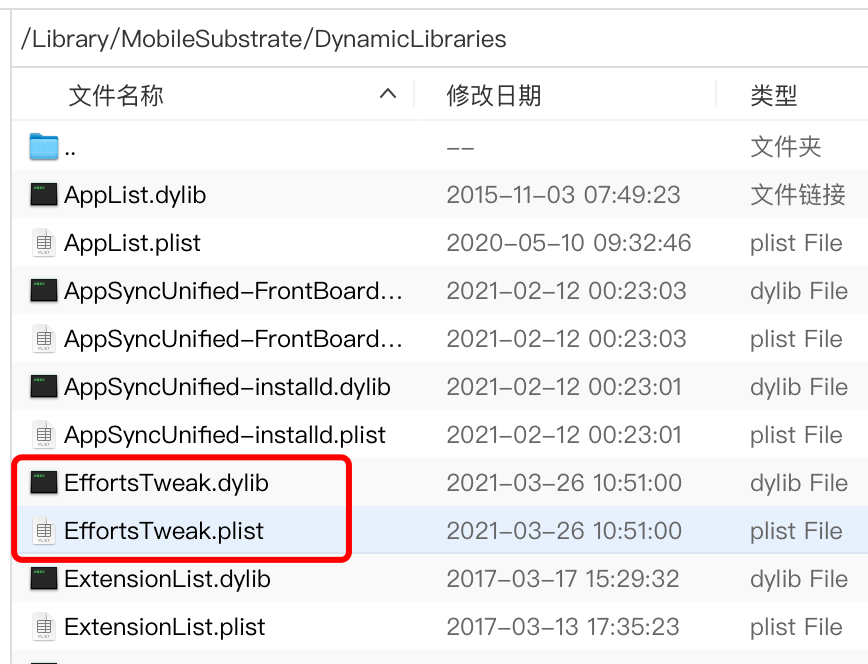
在将插件安装到手机并重启 SpringBoard 后,再次启动 hook 的目标程序,Cydia 将扫描 /Library/MobileSubstrate/DynamicLibraries 目录下的 plist 文件,如果启动的程序的包名包含在 plist 中,那么将通过 DYLD_INSERT_LIBRIRES 方式将动态库依附到目标程序上,然后通过 hook 功能将原方法重新指向到 hook 方法上。
deb 包解压后的结构:
control/control
data/Library/MobileSubstrate/DynamicLibraries/EffortsTweak.dylib
data/Library/MobileSubstrate/DynamicLibraries/EffortsTweak.plist
debian-binary
dylib 为编译后的 Tweak 代码,plist 文件存放需要 hook 的 APP 包名,比如:
{ Filter = { Bundles = ( "com.yingxiong.bense.fqhyxs" ); }; }Tweak加载原理
当打开 APP 时,Cydia Substrate 会去查找 /Library/MobileSubstrate/DynamicLibraries 目录下的 plist 文件。如果有查到启动的 APP 的包名,则让 APP 去加载对应的 dylib,并执行 dylib 中的函数代码,从而实现动态修改 APP 内存中的代码逻辑。
theos 的 tweak 并不会对原来的可执行文件进行修改,仅仅是修改了内存中的代码逻辑。
如果 APP 版本更新,但是没有修改我们 hook 的方法,我们的 Tweak 插件也是有效的,反之亦然。