学习目标
1.【了解】什么是UITableView
2.【理解】UITableView的数据源
3.【理解】UITableView的代理
一、什么是UITableView
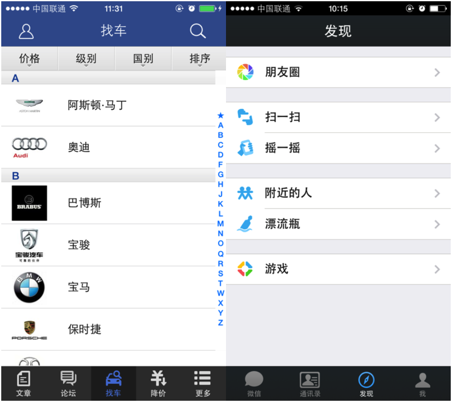
在iOS中,要实现表格数据展示,最常用的做法就是使用UITableView。UITableView继承自UIScrollView,所以它支持也只支持纵向滑动,以下app都是UITableView的使用案例:
UITableView有两种风格,分别是Plain和Grouped。也就是UITableViewStylePlain和UITableViewStyleGrouped,其中左边的是Plain风格的,右边的是Grouped风格,这个区别还是很明显的。
UITableView有两个Delegate分别为:dataSource和delegate。
dataSource是UITableViewDataSource类型,主要为UITableView提供显示用的数据(UITableViewCell),指定UITableViewCell支持的编辑操作类型(insert,delete和reordering),并根据用户的操作进行相应的数据更新操作,如果数据没有更具操作进行正确的更新,可能会导致显示异常,甚至crush。
delegate是UITableViewDelegate类型,主要提供一些可选的方法,用来控制tableView的选择、指定section的头和尾的显示以及协助完成cell的删除和排序等功能。
提到UITableView,就必须的说一说NSIndexPath。UITableView声明了一个NSIndexPath的类别,主要用来标识当前cell的在tableView中的位置,该类别有section和row两个属性,前者标识当前cell处于第几个组中,后者代表在该组中的第几行。
二、UITableView的数据源
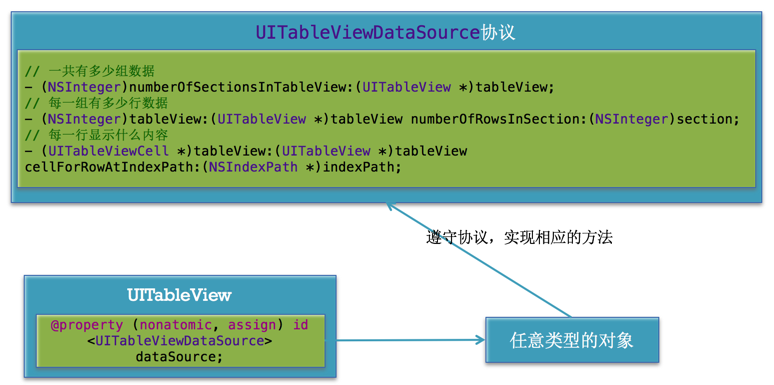
UITableView如果没有数据也就只是一个空壳,如果我们需要在UITableView中展示数据,必须为其指定数据源。也就是为UITableView的dataSource属性赋值一个遵守了UITableViewDataSource协议的OC对象。UITableView会向数据源查询一共有多少行数据以及每一行显示什么数据等。
让UITableView展示数据的一般步骤:
1.让类遵守<UITableViewDataSource>协议。
2.实现协议中的必要方法。
//调用数据源的下面方法得知一共有多少组数据
- (NSInteger)numberOfSectionsInTableView:(UITableView *)tableView;

//调用数据源的下面方法得知每一组有多少行数据
- (NSInteger)tableView:(UITableView *)tableView numberOfRowsInSection:(NSInteger)section;

//调用数据源的下面方法得知每一行显示什么内容
- (UITableViewCell *)tableView:(UITableView *)tableView cellForRowAtIndexPath:(NSIndexPath *)indexPath;
3.指定数据源对象。
@property (nonatomic, weak, nullable) id <UITableViewDataSource> dataSource;
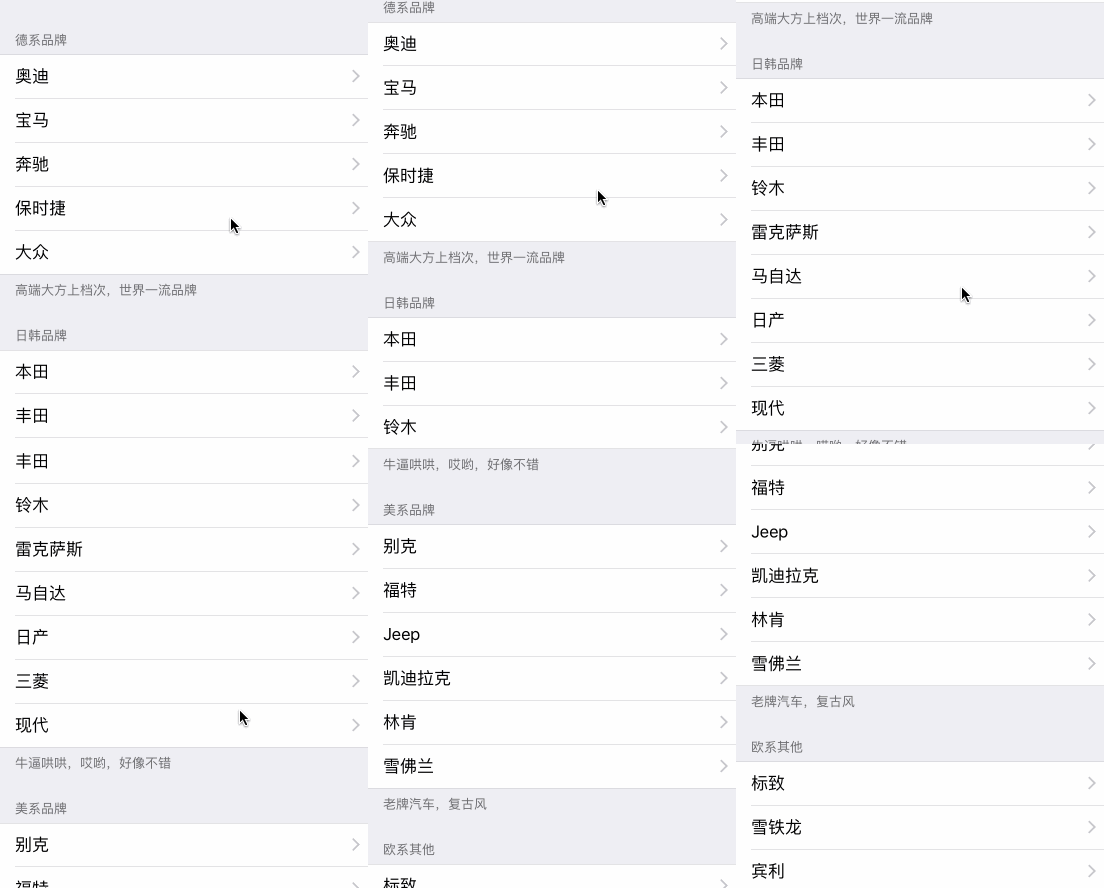
下面以一个简单的例子演示UITableView展示数据步骤,下图是完成后的界面截图:
创建项目导入plist文件,并创建对应模型类。
cars_simple.plist
<?xml version="1.0" encoding="UTF-8"?>
<!DOCTYPE plist PUBLIC "-//Apple//DTD PLIST 1.0//EN" "http://www.apple.com/DTDs/PropertyList-1.0.dtd">
<plist version="1.0">
<array>
	<dict>
		<key>cars</key>
		<array>
			<string>奥迪</string>
			<string>宝马</string>
			<string>奔驰</string>
			<string>保时捷</string>
			<string>大众</string>
		</array>
		<key>title</key>
		<string>德系品牌</string>
		<key>desc</key>
		<string>高端大方上档次,世界一流品牌</string>
	</dict>
	<dict>
		<key>cars</key>
		<array>
			<string>本田</string>
			<string>丰田</string>
			<string>铃木</string>
			<string>雷克萨斯</string>
			<string>马自达</string>
			<string>日产</string>
			<string>三菱</string>
			<string>现代</string>
		</array>
		<key>title</key>
		<string>日韩品牌</string>
		<key>desc</key>
		<string>牛逼哄哄,哎哟,好像不错</string>
	</dict>
	<dict>
		<key>cars</key>
		<array>
			<string>别克</string>
			<string>福特</string>
			<string>Jeep</string>
			<string>凯迪拉克</string>
			<string>林肯</string>
			<string>雪佛兰</string>
		</array>
		<key>title</key>
		<string>美系品牌</string>
		<key>desc</key>
		<string>老牌汽车,复古风</string>
	</dict>
	<dict>
		<key>cars</key>
		<array>
			<string>标致</string>
			<string>雪铁龙</string>
			<string>宾利</string>
			<string>捷豹</string>
			<string>路虎</string>
			<string>劳斯莱斯</string>
			<string>法拉利</string>
			<string>兰博基尼</string>
			<string>玛莎拉蒂</string>
		</array>
		<key>title</key>
		<string>欧系其他</string>
		<key>desc</key>
		<string>优雅高贵,你值得拥有</string>
	</dict>
	<dict>
		<key>cars</key>
		<array>
			<string>比亚迪</string>
			<string>奔腾</string>
			<string>北京汽车</string>
			<string>长城</string>
			<string>东南</string>
			<string>东风</string>
		</array>
		<key>title</key>
		<string>自主品牌</string>
		<key>desc</key>
		<string>Made In China,质量你懂的</string>
	</dict>
</array>
</plist>
JFCar.h
#import <Foundation/Foundation.h>

@interface JFCar : NSObject

@property (strong, nonatomic) NSArray *cars;
@property (copy, nonatomic) NSString *title;
@property (copy, nonatomic) NSString *desc;

//快速创建模型对象的对象方法
- (instancetype)initWithDictionary:(NSDictionary *)dict;

//快速创建模型对象的类方法
+ (instancetype)carWithDictionary:(NSDictionary *)dict;

//返回一个创建好的模型数组
+ (NSArray *)cars;
@end
JFCar.m
#import "JFCar.h"

@implementation JFCar

//快速创建模型对象的对象方法
- (instancetype)initWithDictionary:(NSDictionary *)dict {
    if (self = [super init]) {
        [self setValuesForKeysWithDictionary:dict];
    }
    return self;
}

//快速创建模型对象的类方法
+ (instancetype)carWithDictionary:(NSDictionary *)dict {
    return [[self alloc] initWithDictionary:dict];
}

//返回一个创建好的模型数组
+ (NSArray *)cars {
    //加载plist文件到数组
    NSArray *array = [NSArray arrayWithContentsOfFile:[[NSBundle mainBundle] pathForResource:@"cars_simple.plist" ofType:nil]];

    //创建一个可变数组存储模型对象
    NSMutableArray *arrayM = [NSMutableArray array];
    for (NSDictionary *dict in array) {
        JFCar *car = [JFCar carWithDictionary:dict];
        [arrayM addObject:car];
    }
    return arrayM;
}
@end
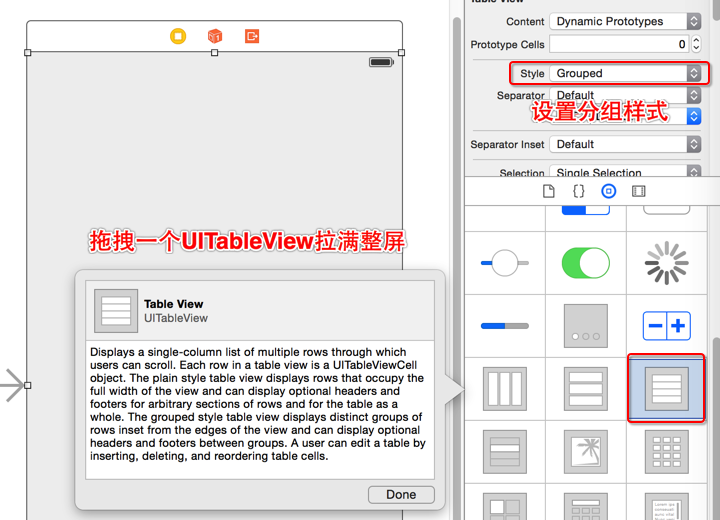
在Main.storyboard中拖拽一个UITableView控件拉满这个屏幕,并进行属性连线操作。
声明一个属性用于存储模型对象数组,并懒加载模型对象数组数据。
@property (strong, nonatomic) NSArray *cars;//声明模型对象数组

//懒加载数据
- (NSArray *)cars {
    if (_cars == nil) {
        //调用JFCar的类方法返回模型数组
        _cars = [JFCar cars];
    }
    return _cars;
}
让当前控制器ViewController遵守<UITableViewDataSource>协议,并实现必要方法,最后为UITableView指定数据源对象。为了展示方便,我们重写prefersStatusBarHidden隐藏状态栏。
ViewController.m
#import "ViewController.h"
#import "JFCar.h"

@interface ViewController () <UITableViewDataSource>
@property (weak, nonatomic) IBOutlet UITableView *tableView;//声明模型对象数组
@property (strong, nonatomic) NSArray *cars;

@end

@implementation ViewController

//隐藏导航栏
- (BOOL)prefersStatusBarHidden {
    return YES;
}

//懒加载数据
- (NSArray *)cars {
    if (_cars == nil) {
        //调用JFCar的类方法返回模型数组
        _cars = [JFCar cars];
    }
    return _cars;
}
- (void)viewDidLoad {
    [super viewDidLoad];

    //指定数据源对象为当前控制器
    self.tableView.dataSource = self;

}

- (void)didReceiveMemoryWarning {
    [super didReceiveMemoryWarning];

}

//一共多少组
- (NSInteger)numberOfSectionsInTableView:(UITableView *)tableView {
    return self.cars.count;
}

//每组有多少行
- (NSInteger)tableView:(UITableView *)tableView numberOfRowsInSection:(NSInteger)section {
    JFCar *car = self.cars[section];
    return car.cars.count;
}

//每组每行如何展示
- (UITableViewCell *)tableView:(UITableView *)tableView cellForRowAtIndexPath:(NSIndexPath *)indexPath {

    //获取当前组的模型对象
    JFCar *car = self.cars[indexPath.section];

    //定义一个标识
    static NSString *ID = @"car";

    //创建cell并指定唯一标识,实现cell重用。以后都是这样写,不过需要封装cell
    UITableViewCell *cell = [tableView dequeueReusableCellWithIdentifier:ID];
    //第一次创建cell将使用以下方式创建
    if (cell == nil) {
        cell = [[UITableViewCell alloc] initWithStyle:UITableViewCellStyleDefault reuseIdentifier:ID];
    }

    //设置辅助指示图样式
    cell.accessoryType = UITableViewCellAccessoryDisclosureIndicator;

    //设置每行的textLabel属性
    cell.textLabel.text = car.cars[indexPath.row];

    return cell;
}

//设置每组的头部标题
- (NSString *)tableView:(UITableView *)tableView titleForHeaderInSection:(NSInteger)section {

    //获取当前组的模型对象
    JFCar *car = self.cars[section];

    return car.title;
}

//设置每组底部标题
- (NSString *)tableView:(UITableView *)tableView titleForFooterInSection:(NSInteger)section {

    //获取当前组的模型对象
    JFCar *car = self.cars[section];

    return car.desc;
}
@end
iOS开发是遵循MVC设计思想的,我们需要对cell进行封装。因为cell是用来展示数据的,所以我们需要封装cell为视图类,继承自UITableViewCell。
JFCarCell.h
#import <UIKit/UIKit.h>
#import "JFCar.h"

@interface JFCarCell : UITableViewCell

//设置cell数据
- (void)setCar:(JFCar *)car andIndex:(NSInteger)index;

//快速创建cell的方法
+ (instancetype)carCell:(UITableView *)tableView;

@end
JFCarCell.m
#import "JFCarCell.h"

@implementation JFCarCell

//快速创建cell的方法
+ (instancetype)carCell:(UITableView *)tableView {

    //声明一个唯一标识
    static NSString *ID = @"car";

    //在缓存中创建cell,如果换成中有需要的cell就不会创建新的cell
    JFCarCell *cell = [tableView dequeueReusableCellWithIdentifier:ID];

    //第一次创建cell,缓存中是没有任何cell的。所以需要创建新的cell
    if (cell == nil) {
        cell = [[JFCarCell alloc] initWithStyle:UITableViewCellStyleDefault reuseIdentifier:ID];
    }

    //返回创建好的cell
    return cell;
}

//设置cell数据
- (void)setCar:(JFCar *)car andIndex:(NSInteger)index {

    self.textLabel.text = car.cars[index];

}

@end
ViewController.m
#import "ViewController.h"
#import "JFCar.h"
#include "JFCarCell.h"
@interface ViewController () <UITableViewDataSource>
@property (weak, nonatomic) IBOutlet UITableView *tableView;//声明模型对象数组
@property (strong, nonatomic) NSArray *cars;

@end

@implementation ViewController

//隐藏导航栏
- (BOOL)prefersStatusBarHidden {
    return YES;
}

//懒加载数据
- (NSArray *)cars {
    if (_cars == nil) {
        //调用JFCar的类方法返回模型数组
        _cars = [JFCar cars];
    }
    return _cars;
}
- (void)viewDidLoad {
    [super viewDidLoad];

    //指定数据源对象为当前控制器
    self.tableView.dataSource = self;

}

- (void)didReceiveMemoryWarning {
    [super didReceiveMemoryWarning];

}

//一共多少组
- (NSInteger)numberOfSectionsInTableView:(UITableView *)tableView {
    return self.cars.count;
}

//每组有多少行
- (NSInteger)tableView:(UITableView *)tableView numberOfRowsInSection:(NSInteger)section {
    JFCar *car = self.cars[section];
    return car.cars.count;
}

//每组每行如何展示
- (UITableViewCell *)tableView:(UITableView *)tableView cellForRowAtIndexPath:(NSIndexPath *)indexPath {

    //获取当前组的模型对象
    JFCar *car = self.cars[indexPath.section];

    JFCarCell *cell = [JFCarCell carCell:tableView];

    //设置每行尾部的标记
    cell.accessoryType = UITableViewCellAccessoryDisclosureIndicator;

    //设置每行的textLabel属性
    [cell setCar:car andIndex:indexPath.row];

    return cell;
}

//设置每组的头部标题
- (NSString *)tableView:(UITableView *)tableView titleForHeaderInSection:(NSInteger)section {

    //获取当前组的模型对象
    JFCar *car = self.cars[section];

    return car.title;
}

//设置每组底部标题
- (NSString *)tableView:(UITableView *)tableView titleForFooterInSection:(NSInteger)section {

    //获取当前组的模型对象
    JFCar *car = self.cars[section];

    return car.desc;
}
@end
三、UITableView的代理
开发中通常都要为UITableView设置代理对象(delegate),监听UITableView触发某个事件时做出相应的处理,比如选中了某一行。凡是遵守了UITableViewDelegate协议的OC对象,都可以是UITableView的代理对象。
下面通过一个简单的实例来演示UITableView代理(delegate)的作用。如下图所示:
创建项目,在Main.storyboard中拖拽一个满屏的UITableView控件并进行属性控件连续,然后导入plist文件创建模型类。
JFHero.h
#import <Foundation/Foundation.h>

@interface JFHero : NSObject

@property (copy, nonatomic) NSString *icon;
@property (copy, nonatomic) NSString *intro;
@property (copy, nonatomic) NSString *name;

//快速创建模型对象的对象方法
- (instancetype)initWithDictionary:(NSDictionary *)dict;

//快速创建模型对象的类方法
+ (instancetype)heroWithDictionary:(NSDictionary *)dict;

//返回一个模型数组
+ (NSArray *)heros;
@end
JFHero.m
#import "JFHero.h"

@implementation JFHero

//快速创建模型对象的对象方法
- (instancetype)initWithDictionary:(NSDictionary *)dict {
    if (self = [super init]) {
        [self setValuesForKeysWithDictionary:dict];
    }
    return self;
}

//快速创建模型对象的类方法
+ (instancetype)heroWithDictionary:(NSDictionary *)dict {
    return [[self alloc] initWithDictionary:dict];
}

//返回一个模型数组
+ (NSArray *)heros {
    NSArray *array = [NSArray arrayWithContentsOfFile:[[NSBundle mainBundle] pathForResource:@"heros.plist" ofType:nil]];

    NSMutableArray *arrayM = [NSMutableArray array];

    for (NSDictionary *dict in array) {
        JFHero *hero = [JFHero heroWithDictionary:dict];
        [arrayM addObject:hero];
    }
    return arrayM;
}
@end
封装cell,提供一个快速创建cell的方法并实现cell的重用,再提供一个为cell属性赋值的方法。这里使用的是将模型对象定义为属性,并重写set方法为cell的属性赋值。
JFHeroCell.h
#import <UIKit/UIKit.h>
#import "JFHero.h"

@interface JFHeroCell : UITableViewCell

@property (strong, nonatomic) JFHero *hero;

//快速创建一个cell对象
+ (instancetype)heroCell:(UITableView *)tableView;

@end
JFHeroCell.m
#import "JFHeroCell.h"

@implementation JFHeroCell

//快速创建一个cell对象
+ (instancetype)heroCell:(UITableView *)tableView {
    NSString *ID = @"hero";

    JFHeroCell *cell = [tableView dequeueReusableCellWithIdentifier:ID];

    if (cell == nil) {
        cell = [[JFHeroCell alloc] initWithStyle:UITableViewCellStyleSubtitle reuseIdentifier:ID];
    }

    tableView.rowHeight = 60;

    return cell;
}

//重新set方法为cell赋值
- (void)setHero:(JFHero *)hero {
    _hero = hero;

    self.imageView.image = [UIImage imageNamed:hero.icon];
    self.textLabel.text = hero.name;
    self.detailTextLabel.text = hero.intro;

}


@end
1.在控制器定义一个模型对象数组属性,并重新属性的get方法实现懒加载。
2.遵守UITableViewDataSource数据源协议、UITableViewDelegate代理协议、UIAlertViewDelegate对话框代理协议。
3.实现各种代理方法,并为UITableView指定数据源对象、代理对象为当前控制器。为UIAlertView指定代理对象为当前控制器。
具体代码如下:
ViewController.m
#import "ViewController.h"
#import "JFHero.h"
#import "JFHeroCell.h"

@interface ViewController () <UITableViewDataSource,UITableViewDelegate,UIAlertViewDelegate>

@property (strong, nonatomic) NSArray *heros;//声明模型对象数组
@property (weak, nonatomic) IBOutlet UITableView *tableView;

@end

@implementation ViewController

//隐藏状态栏
- (BOOL)prefersStatusBarHidden {
    return YES;
}

//懒加载
- (NSArray *)heros {
    if (_heros == nil) {
        //调用类方法返回模型数组
        _heros = [JFHero heros];
    }
    return _heros;
}

- (void)viewDidLoad {
    [super viewDidLoad];

    //指定数据源对象
    self.tableView.dataSource = self;

    //指定代理对象
    self.tableView.delegate = self;

}

- (void)didReceiveMemoryWarning {
    [super didReceiveMemoryWarning];
}

//一共有多少组
- (NSInteger)numberOfSectionsInTableView:(UITableView *)tableView {
    return 1;
}

//每组多少行
- (NSInteger)tableView:(UITableView *)tableView numberOfRowsInSection:(NSInteger)section {

    return self.heros.count;
}

//每行如何显示
- (UITableViewCell *)tableView:(UITableView *)tableView cellForRowAtIndexPath:(NSIndexPath *)indexPath {

    //创建cell
    JFHeroCell *cell = [JFHeroCell heroCell:tableView];

    //为cell赋值
    cell.hero = self.heros[indexPath.row];

    return cell;
}

//当点击了某行的时候触发
- (void)tableView:(UITableView *)tableView didSelectRowAtIndexPath:(NSIndexPath *)indexPath {
    //取出当前行的模型对象
    JFHero *hero = self.heros[indexPath.row];

    //创建对话框
    UIAlertView *alert = [[UIAlertView alloc] initWithTitle:@"修改操作" message:@"请输入新的姓名" delegate:self cancelButtonTitle:@"取消" otherButtonTitles:@"确定", nil];

    //设置对话框的样式
    alert.alertViewStyle = UIAlertViewStylePlainTextInput;

    //获取当前模型对象的name赋值给对话框
    [alert textFieldAtIndex:0].text = hero.name;

    //添加一个清除文本框按钮
    [alert textFieldAtIndex:0].clearButtonMode = UITextFieldViewModeWhileEditing;

    //把行赋值给对话框的tag
    alert.tag = indexPath.row;

    //显示对话框
    [alert show];

}

//监听对话框点击选项
- (void)alertView:(UIAlertView *)alertView clickedButtonAtIndex:(NSInteger)buttonIndex {

    //点击了确认
    if (buttonIndex == 1) {

        //获取当前行的模型对象
        JFHero *hero = self.heros[alertView.tag];

        //重新为模型对象赋值
        hero.name = [alertView textFieldAtIndex:0].text;

        //封装要刷新的具体某组某行
        NSIndexPath *path = [NSIndexPath indexPathForRow:alertView.tag inSection:0];

        //刷新指定某组某行数据
        [self.tableView reloadRowsAtIndexPaths:@[path] withRowAnimation:UITableViewRowAnimationBottom];

    }
}

@end
