学习目标
1.【掌握】xib自定义cell之团购案例
2.【掌握】代码自定义cell之微博案例
一、xib自定义cell之团购案例
UITableViewCell提供了四种Cell样式,但是自带的样式往往不能满足我们的开发需求。当系统自带cell样式不能满足我们开发需求时,就应该自己手动创建cell。
手动创建cell的两种方式:
当cell的布局样式相同,只是数据不同我们就可以使用xib快速创建cell。
当布局样式不同的时候,我们就不能使用xib来创建cell,而是需要重写初始化cell的方法代码创建cell。
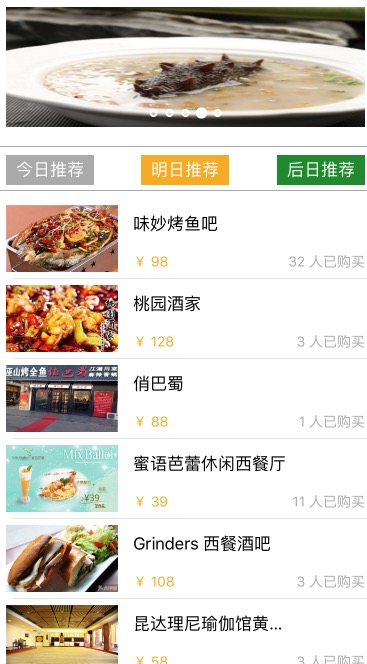
先了解下简单的xib快速创建cell案例,我们需要做一个团购商品展示页面,如下图所示:点击这里查看动态图
需求:顶部有图片轮播,中间是商品列表,底部有加载更多按钮并且点击后能加载新的cell。
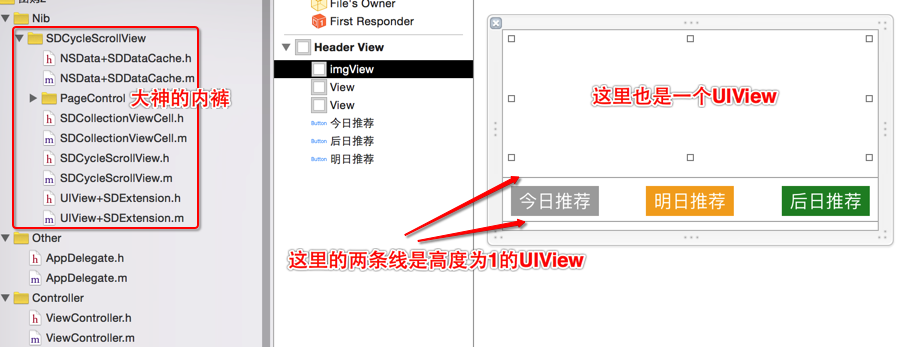
分析:从截图可以看出每个cell的布局都是相同的,有商品图片、名称、价格、购买数量。所以我们可以使用xib来创建,头部轮播器以前以后做过了,这里就不重点解释。今日、明日、后日推荐按钮和图片轮播是一个view。底部加载更多也是一个单独View,不过他们都随着tableview一起滚动,所以他们都是在tableview中。
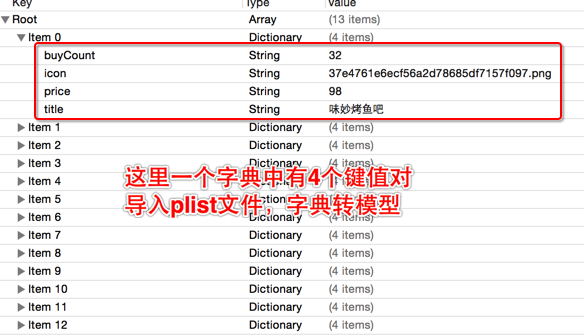
首先不考虑界面,先创建项目导入素材和plist文件,并封装模型对象。
JFGoods.h
#import <Foundation/Foundation.h>

@interface JFGoods : NSObject
@property (copy, nonatomic) NSString *buyCount;
@property (copy, nonatomic) NSString *icon;
@property (copy, nonatomic) NSString *price;
@property (copy, nonatomic) NSString *title;

//快速创建模型对象的对象方法
- (instancetype)initWithDictionary:(NSDictionary *)dict;

//快速创建模型对象的类方法
+ (instancetype)goodsWithDictionary:(NSDictionary *)dict;

//返回一个模型数组
+ (NSMutableArray *)goodss;
@end
JFGoods.m
#import "JFGoods.h"

@implementation JFGoods

//快速创建模型对象的对象方法
- (instancetype)initWithDictionary:(NSDictionary *)dict {
    if (self = [super init]) {
        [self setValuesForKeysWithDictionary:dict];
    }
    return self;
}
//快速创建模型对象的类方法
+ (instancetype)goodsWithDictionary:(NSDictionary *)dict {
    return [[self alloc] initWithDictionary:dict];
}

//返回一个模型数组
+ (NSMutableArray *)goodss {
    NSArray *array = [NSArray arrayWithContentsOfFile:[[NSBundle mainBundle] pathForResource:@"tgs.plist" ofType:nil]];

    NSMutableArray *arrayM = [NSMutableArray array];

    for (NSDictionary *dict in array) {
        JFGoods *goods = [JFGoods goodsWithDictionary:dict];
        [arrayM addObject:goods];
    }
    return arrayM;
}
@end
封装好模型后,创建xib文件。注意这里是UITableViewCell控件而不是UIView,因为只有UITableViewCell才能设置cell重用标识符。
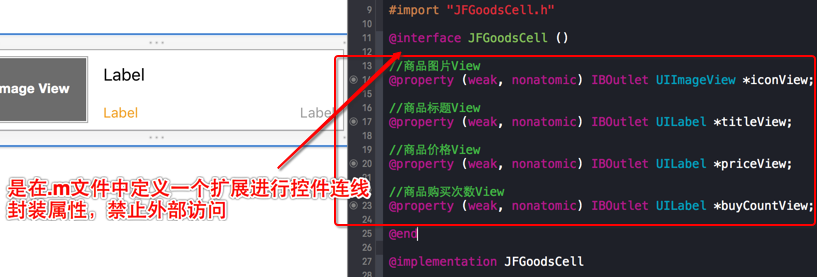
创建好xib后就创建封装cell类,注意这个类是继承自UITableViewCell。然后再xib的Custom Class选项中制定Class为我们创建的类,再进行控件属性拖线。然后定义对应方法,加载xib并创建创建cell,再对其进行子控件赋值数据。
JFGoodsCell.h
#import <UIKit/UIKit.h>
#import "JFGoods.h"

@interface JFGoodsCell : UITableViewCell

@property (strong, nonatomic) JFGoods *goods;

//快速创建cell
+ (instancetype)goodsCell:(UITableView *)tableView;

@end
JFGoodsCell.m
#import "JFGoodsCell.h"

@interface JFGoodsCell ()

//商品图片View
@property (weak, nonatomic) IBOutlet UIImageView *iconView;

//商品标题View
@property (weak, nonatomic) IBOutlet UILabel *titleView;

//商品价格View
@property (weak, nonatomic) IBOutlet UILabel *priceView;

//商品购买次数View
@property (weak, nonatomic) IBOutlet UILabel *buyCountView;

@end

@implementation JFGoodsCell

//快速创建cell
+ (instancetype)goodsCell:(UITableView *)tableView {

    //唯一标识符
    static NSString *ID = @"goods";

    //从缓存中创建cell
    JFGoodsCell *cell = [tableView dequeueReusableCellWithIdentifier:ID];

    //如果缓存中没有就创建
    if (cell == nil) {

        //从xib创建cell,xib已经指定了唯一标识符为goods。所以这里实现了cell重用
        cell = [[[NSBundle mainBundle] loadNibNamed:@"JFGoodsCell" owner:nil options:nil] lastObject];
    }

    //设置单元行高度
    tableView.rowHeight = 80;

    return cell;
}

//重写set方法为控件设置数据
- (void)setGoods:(JFGoods *)goods {
    _goods = goods;

    //为控件加载数据
    self.iconView.image = [UIImage imageNamed:goods.icon];
    self.titleView.text = goods.title;
    self.priceView.text = [NSString stringWithFormat:@"¥ %@",goods.price];
    self.buyCountView.text = [NSString stringWithFormat:@"%@ 人已购买",goods.buyCount];
}

@end
顶部的UIView我使用了网上下载的类库快速创建,类库地址:https://github.com/gsdios/SDCycleScrollView 。下载类库,并导入我们的工程,再使用xib来创建一个UIView,在UIView中再创建一个用于展示轮播的UIView并进行控件属性连线,然后将创建好的轮播器添加到这个UIView中。
提供一个快速创建顶部View的类方法,并实现。
JFHeaderView.h
#import <UIKit/UIKit.h>

@interface JFHeaderView : UIView

//快速创建头部View
+ (instancetype)headerView;

@end
JFHeaderView.m
#import "JFHeaderView.h"
#import "SDCycleScrollView.h"

@interface JFHeaderView ()
//展示轮播的UIView
@property (weak, nonatomic) IBOutlet UIView *imgView;

@end

@implementation JFHeaderView

//快速创建头部View
+ (instancetype)headerView {
    return [[[NSBundle mainBundle] loadNibNamed:@"JFHeaderView" owner:self options:nil] lastObject];
}

//当加载xib到界面之后,会调用此方法进行xib文件的初始化操作
- (void)awakeFromNib {

    //一定要调用父类的awakeFromNib方法
    [super awakeFromNib];

    //封装图片对象
    NSArray *images = @[[UIImage imageNamed:@"ad_00"],
                        [UIImage imageNamed:@"ad_01"],
                        [UIImage imageNamed:@"ad_02"],
                        [UIImage imageNamed:@"ad_03"],
                        [UIImage imageNamed:@"ad_04"]
                        ];

    CGFloat width = self.imgView.bounds.size.width;

    //创建不带标题的图片轮播器
    SDCycleScrollView *cycleScrollView = [SDCycleScrollView cycleScrollViewWithFrame:CGRectMake(0, 0, width, 120) imagesGroup:images];

    //轮播是否循环
    cycleScrollView.infiniteLoop = YES;

    //设置页码样式
    cycleScrollView.pageControlStyle = SDCycleScrollViewPageContolStyleAnimated;

    //设置轮播时间间隔,默认1.0秒
    cycleScrollView.autoScrollTimeInterval = 2.0;

    //清除缓存
    [cycleScrollView clearCache];

    //添加轮播View到父容器中
    [self.imgView addSubview:cycleScrollView];

}
@end
效果如图所示:
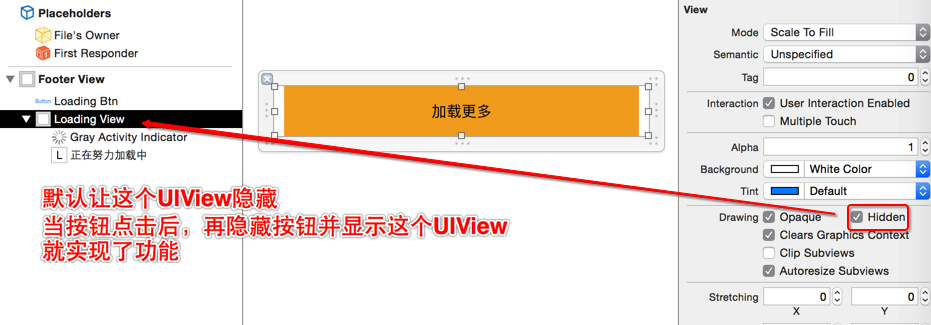
底部也是一个单独的UIView,也可以使用xib来创建。默认能点击,说明有一个Button,点击后Button隐藏Button并显示一个菊花转的控件和Label。拖好控件然后再进行LoadingView和LoadingBtn的属性连线。
加载更多数据的思路分析:
点击按钮后不仅仅是能隐藏按钮、显示加载View,还能实现真正的加载数据功能。要实现这个功能,我们必须要用到当前的tableview和模型数组,并能修改模型数组。
如果将控制器作为方法参数传递过来也是可以实现的,但是这不符合MVC设计思想,所以我们将控制器设为代理来帮我们完成控制器才能完成的事情。
给按钮添加单击事件,调用代理方法。在点击了按钮后,会触发单击事件,调用self中的方法来完成数据添加功能。
JFFooterView.h
#import <UIKit/UIKit.h>
@class JFFooterView;

//定义一个代理协议
@protocol JFFooterViewDelegate <NSObject>

//必须实现的代理方法
@required
- (void)footerViewDidClicking:(JFFooterView *)footerView;

@end
@interface JFFooterView : UIView

//快速创建底部View
+ (instancetype)footerView;
//底部View的代理属性
@property (weak, nonatomic) id<JFFooterViewDelegate> delegate;
@end
JFFooterView.m
#import "JFFooterView.h"

@interface JFFooterView ()
@property (weak, nonatomic) IBOutlet UIView *loadingView;//加载View
@property (weak, nonatomic) IBOutlet UIButton *loadingBtn;//加载Button

//点击加载按钮事件
- (IBAction)loadingClick;

@end

@implementation JFFooterView

//快速创建底部View
+ (instancetype)footerView {
    return [[[NSBundle mainBundle] loadNibNamed:@"JFFooterView" owner:self options:nil] lastObject];
}

//点击加载按钮事件
- (IBAction)loadingClick {
    //点击后让按钮隐藏,加载view取消隐藏
    self.loadingBtn.hidden = YES;
    self.loadingView.hidden = NO;
    dispatch_after(dispatch_time(DISPATCH_TIME_NOW, (int64_t)(1 * NSEC_PER_SEC)), dispatch_get_main_queue(), ^{
        //让按钮隐藏取消隐藏,加载view隐藏
        self.loadingBtn.hidden = NO;
        self.loadingView.hidden = YES;

        //加载数据,判断是否实现了代理方法
        if ([self.delegate respondsToSelector:@selector(footerViewDidClicking:)]) {
            //调用代理方法,将加载更多数据功能交给代理来完成
            [self.delegate footerViewDidClicking:self];
        } else {
            NSLog(@"没有实现代理方法");
        }
    });
}
@end
完成了封装数据模型、封装Cell、创建顶部和底部UIView后,最后来控制器进行各种调用。先在Main.storyboard中拖拽一个满屏的UITableView控件并进行属性连线操作。最后再控制器中加载数据、创建cell并实现加载更多数据的代理方法。
ViewController.m
#import "ViewController.h"
#import "JFGoods.h"
#import "JFGoodsCell.h"
#import "JFHeaderView.h"
#import "JFFooterView.h"

@interface ViewController () <UITableViewDataSource,JFFooterViewDelegate>
@property (weak, nonatomic) IBOutlet UITableView *tableView;
@property (strong, nonatomic) NSMutableArray *goodss;

@end

@implementation ViewController

//隐藏状态栏
- (BOOL)prefersStatusBarHidden {
    return YES;
}

- (void)viewDidLoad {
    [super viewDidLoad];

    //指定数据源对象
    self.tableView.dataSource = self;

    //设置头部view
    JFHeaderView *headerView = [JFHeaderView headerView];
    self.tableView.tableHeaderView = headerView;

    //设置底部view
    JFFooterView *footerView = [JFFooterView footerView];
    self.tableView.tableFooterView = footerView;

    //让当前控制器作为底部View的代理对象
    footerView.delegate = self;
}

- (void)didReceiveMemoryWarning {
    [super didReceiveMemoryWarning];
    // Dispose of any resources that can be recreated.
}

//懒加载模型数组
- (NSArray *)goodss {
    if (_goodss == nil) {
        _goodss = [JFGoods goodss];
    }
    return _goodss;
}

//每组多少行
- (NSInteger)tableView:(UITableView *)tableView numberOfRowsInSection:(NSInteger)section {
    return self.goodss.count;
}

//创建cell
- (UITableViewCell *)tableView:(UITableView *)tableView cellForRowAtIndexPath:(NSIndexPath *)indexPath {

    //取出商品模型
    JFGoods *goods = self.goodss[indexPath.row];

    //创建cell
    JFGoodsCell *cell = [JFGoodsCell goodsCell:tableView];

    //为cell赋值数据
    cell.goods = goods;

    return cell;
}

//当点击了底部View后触发的代理方法
- (void)footerViewDidClicking:(JFFooterView *)footerView {

    //创建商品信息字典
    NSDictionary *dict = @{@"title" : @"镀金翔", @"icon" : @"5ee372ff039073317a49af5442748071", @"price" : @"10", @"buyCount" : @"1009"};

    //创建商品模型
    JFGoods *newGoods = [JFGoods goodsWithDictionary:dict];

    //添加到模型数组
    [self.goodss addObject:newGoods];

    //刷新所有数据
    [self.tableView reloadData];

    //刷新单行数据,实现添加商品动画效果
    NSIndexPath *path = [NSIndexPath indexPathForRow:self.goodss.count - 1 inSection:0];
    [self.tableView reloadRowsAtIndexPaths:@[path] withRowAnimation:UITableViewRowAnimationBottom];

    //重新设置偏移值
    self.tableView.contentOffset = CGPointMake(0, CGRectGetMaxY(footerView.frame) - self.tableView.frame.size.height);
}

@end
案例易错总结:
1.通过plist加载模型数据,Controller中懒加载数据,设置tableview的数据源和代理对象。
2.默认情况xib和视图类是不能进行连线操作的,需要在xib中指定自定义类。
3.要给xib中的控件赋值,就必须把模型对象传递给cell,可以设置方法或直接定义模型属性。
4.加载xib创建cell时要注意xib不能加后缀名,并且是返回数组最后一个元素。
5.整个案例以MVC模式来设计,设置MVC逻辑group分类管理。
6.底部View加载更多数据用代理来完成,不要把控制器传递给底部View类。
二、代码自定义cell之微博案例
当每个cell的结构样式不同的时候,我们就不能使用xib来快速创建cell,而是通过代码创建控件来创建cell。我们通过一个微博案例来演示代码创建cell的方法,下图就是微博案例完成后的截图:点击这里查看动态图
需求:实现微博消息界面,每个人都有头像且尺寸一样,每个人都有名字字数不一定相同,有vip就显示皇冠没有就不显示,正文自动换行,有配图就显示配图没有就不显示。
分析:从上图可以看出,cell中应该有头像、昵称、vip、正文、配图控件。且每个控件之间有个固定间距,vip的frame根据昵称的x坐标来决定,正文的高度决定了配图的坐标,配图尺寸可以定死。由此可得知,昵称、正文需要计算宽、高,并且是根据昵称的字数、字体来计算。
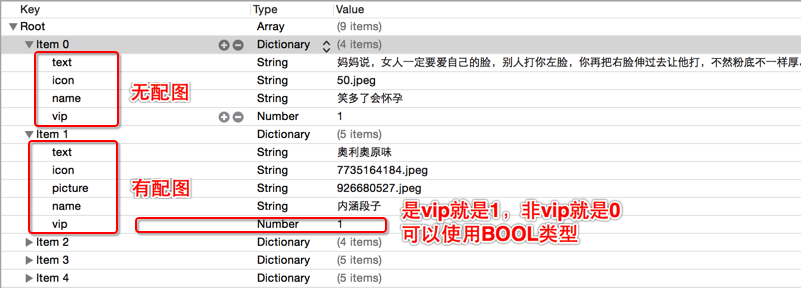
导入素材和plist文件,并封装模型。注意这里字典中国键值对个数不是统一的,有些没有picture,但我们封装的时候按照最多键值对的字典来定义属性。因为属性都有默认值,如果是NSString则默认为nil,将nil赋值给控件并不会对程序造成影响。
JFWeibo.h
#import <Foundation/Foundation.h>

@interface JFWeibo : NSObject

@property (copy, nonatomic) NSString *icon;
@property (copy, nonatomic) NSString *name;
@property (assign, nonatomic, getter=isVip) BOOL vip;
@property (copy, nonatomic) NSString *text;
@property (copy, nonatomic) NSString *picture;

//快速创建模型对象的对象方法
- (instancetype)initWithDictionary:(NSDictionary *)dict;
//快速创建模型对象的类方法
+ (instancetype)weiboWithDictionary:(NSDictionary *)dict;

//返回模型数组
+ (NSArray *)weibos;

@end
JFWeibo.m
#import "JFWeibo.h"

@implementation JFWeibo

//快速创建模型对象的对象方法
- (instancetype)initWithDictionary:(NSDictionary *)dict {
    if (self = [super init]) {
        [self setValuesForKeysWithDictionary:dict];
    }
    return self;
}
//快速创建模型对象的类方法
+ (instancetype)weiboWithDictionary:(NSDictionary *)dict {
    return [[self alloc] initWithDictionary:dict];
}

//返回模型数组
+ (NSArray *)weibos {
    NSArray *array = [NSArray arrayWithContentsOfFile:[[NSBundle mainBundle] pathForResource:@"statuses.plist" ofType:nil]];

    NSMutableArray *arrayM = [NSMutableArray array];
    for (NSDictionary *dict in array) {
        JFWeibo *weibo = [JFWeibo weiboWithDictionary:dict];
        [arrayM addObject:weibo];
    }
    return arrayM;
}

@end
代码自定义cell的高度每行都不同,所以一般不能通过tableView.rowHeight属性来定义。我们需要根据每个cell子控件的frame计算每个cell的高度,并且需要通过UITableView的代理方法来指定每个cell的高度。
但是:指定cell高度的代理方法是在创建调用创建cell的方法之前调用的,也就是我们需要在创建cell之前就计算出cell子控件的frame和cell的高度。
这个UITableView的代理方法返回每个cell的高度,执行优先级高于下面返回cell的方法。
- (CGFloat)tableView:(UITableView *)tableView heightForRowAtIndexPath:(NSIndexPath *)indexPath;
这个UITableView的数据源方法返回cell,但是他的调用优先级比上面的代理方法优先级低,也就是后执行这个方法。
- (UITableViewCell *)tableView:(UITableView *)tableView cellForRowAtIndexPath:(NSIndexPath *)indexPath;
通过上面的分析得之,我们需要在创建cell之前计算好cell子控件的frame和cell的高度。所以我们封装一个cell的frame模型类,通过模型数据来计算cell子控件的frame和cell的高度。
JFWeiboFrame.h
#import <Foundation/Foundation.h>
#import <UIKit/UIKit.h>
@class JFWeibo;

//在这里定于字体宏,当其他类导入头文件后也能使用
#define nameFont [UIFont systemFontOfSize:18]
#define textFont [UIFont systemFontOfSize:16]

@interface JFWeiboFrame : NSObject

//数据模型对象
@property (strong, nonatomic) JFWeibo *weibo;

//cell高度
@property (assign, nonatomic, readonly) CGFloat cellHeight;

//各个子控件的frame
@property (assign, nonatomic, readonly) CGRect iconFrame;
@property (assign, nonatomic, readonly) CGRect nameFrame;
@property (assign, nonatomic, readonly) CGRect vipFrame;
@property (assign, nonatomic, readonly) CGRect textFrame;
@property (assign, nonatomic, readonly) CGRect pictureFrame;

//返回frame模型数组
+ (NSArray *)weiboFrames;

@end
JFWeiboFram.m
#import "JFWeiboFrame.h"
#import "JFWeibo.h"

//每个子控件之间的间距
#define margin 10

@implementation JFWeiboFrame

//返回frame模型数组
+ (NSArray *)weiboFrames {
    NSArray *array = [JFWeibo weibos];

    NSMutableArray *arrayM = [NSMutableArray array];
    for (JFWeibo *weibo in array) {

        //创建frame模型
        JFWeiboFrame *weiboFrame = [[JFWeiboFrame alloc] init];

        //为frame模型赋值模型数据,因为重写了set方法。所以会在赋值后计算cell子控件的frame和行高
        weiboFrame.weibo = weibo;

        //将计算好cell子控件的frame和行高的frame模型存到数组
        [arrayM addObject:weiboFrame];
    }
    return arrayM;
}

//重写set方法,初始化frame和行高
- (void)setWeibo:(JFWeibo *)weibo {
    _weibo = weibo;

    //初始化frame
    [self loadingFrame];

    //初始化行高
    [self loadingRowHeight];

}

//初始化frame
- (void)loadingFrame {

    //头像
    CGFloat iconW = 30;
    CGFloat iconH = iconW;
    CGFloat iconX = margin;
    CGFloat iconY = iconX;
    _iconFrame = CGRectMake(iconX, iconY, iconW, iconH);

    //名字
    CGSize nameSize = [self.weibo.name boundingRectWithSize:CGSizeMake(MAXFLOAT, MAXFLOAT) options:NSStringDrawingUsesLineFragmentOrigin attributes:@{NSFontAttributeName : nameFont} context:nil].size;
    CGFloat nameW = nameSize.width;
    CGFloat nameH = nameSize.height;
    CGFloat nameX = CGRectGetMaxX(_iconFrame) + margin;
    CGFloat nameY = (iconH - nameH) / 2 + margin;
    _nameFrame = CGRectMake(nameX, nameY, nameW, nameH);

    //vip
    CGFloat vipW = 14;
    CGFloat vipH = 14;
    CGFloat vipX = CGRectGetMaxX(_nameFrame) + margin;
    CGFloat vipY = (iconH - vipH) / 2 + margin;
    _vipFrame = CGRectMake(vipX, vipY, vipW, vipH);

    //正文
    CGSize textSize = [self.weibo.text boundingRectWithSize:CGSizeMake(355, MAXFLOAT) options:NSStringDrawingUsesLineFragmentOrigin attributes:@{NSFontAttributeName : textFont} context:nil].size;
    CGFloat textW = textSize.width;
    CGFloat textH = textSize.height;
    CGFloat textX = margin;
    CGFloat textY = CGRectGetMaxY(_iconFrame) + margin;
    _textFrame = CGRectMake(textX, textY, textW, textH);

    //配图
    CGFloat pictureW = 100;
    CGFloat pictureH = 100;
    CGFloat pictureX = margin;
    CGFloat pictureY = CGRectGetMaxY(_textFrame) + margin;
    _pictureFrame = CGRectMake(pictureX, pictureY, pictureW, pictureH);
}

//初始化行高
- (void)loadingRowHeight {
    if (self.weibo.picture) {
        _cellHeight = CGRectGetMaxY(_pictureFrame) + margin;
    } else {
        _cellHeight = CGRectGetMaxY(_textFrame) + margin;
    }
}

@end
封装好cell的frame后就开始封装cell,因为我们每个cell的布局样式不同,所以只能使用代码创建子控件自定义cell。封装cell的类中不需要模型属性,直接定于frame模型属性就行了,因为frame模型属性中就有模型属性。
JFWeiboFrame.h
#import <UIKit/UIKit.h>
@class JFWeiboFrame;

@interface JFWeiboCell : UITableViewCell

//frame模型对象属性
@property (strong, nonatomic) JFWeiboFrame *weiboFrame;

//快速创建cell
+ (instancetype)weiboCell:(UITableView *)tableView;

@end
注意我们需要重写initWithStyle:reuseIdentifier:方法创建cell的子控件,因为系统自带的cell样式和xib都不能使用,只能代码创建cell的子控件来展示数据。
JFWeiboFrame.m
#import "JFWeiboCell.h"
#import "JFWeibo.h"
#import "JFWeiboFrame.h"

@interface JFWeiboCell ()
@property (weak, nonatomic) UIImageView *iconView;      //头像
@property (weak, nonatomic) UILabel *nameView;          //名字
@property (weak, nonatomic) UIImageView *vipView;       //vip
@property (weak, nonatomic) UILabel *textView;          //文本
@property (weak, nonatomic) UIImageView *pictureView;   //配图

@end

@implementation JFWeiboCell

//快速创建cell
+ (instancetype)weiboCell:(UITableView *)tableView {

    static NSString *ID = @"weibo";

    //从缓存中创建cell
    JFWeiboCell *cell = [tableView dequeueReusableCellWithIdentifier:ID];

    if (cell == nil) {
        //缓存中么有cell就新创建,这里的默认初始化方法不能满足需求,需重写
        cell = [[JFWeiboCell alloc] initWithStyle:UITableViewCellStyleDefault reuseIdentifier:ID];
    }
    return cell;
}

//重写initWithStyle:reuseIdentifier:方法创建cell的子控件
- (instancetype)initWithStyle:(UITableViewCellStyle)style reuseIdentifier:(NSString *)reuseIdentifier {

    //重写父类初始化方法,需先调用父类初始化方法初始化父类成员
    if (self = [super initWithStyle:style reuseIdentifier:reuseIdentifier]) {

        //头像
        UIImageView *iconView = [[UIImageView alloc] init];
        [self addSubview:iconView];
        self.iconView = iconView;

        //名字
        UILabel *nameView = [[UILabel alloc] init];
        nameView.font = nameFont;       //设置字体
        [self addSubview:nameView];
        self.nameView = nameView;

        //vip
        UIImageView *vipView = [[UIImageView alloc] init];
        [self addSubview:vipView];
        self.vipView = vipView;

        //正文
        UILabel *textView = [[UILabel alloc] init];
        textView.font = textFont;       //设置字体
        textView.numberOfLines = 0;     //自动换行
        [self addSubview:textView];
        self.textView = textView;

        //配图
        UIImageView *pictureView = [[UIImageView alloc] init];
        [self addSubview:pictureView];
        self.pictureView = pictureView;

    }
    return self;
}

//重写set方法为cell的子控件赋值
- (void)setWeiboFrame:(JFWeiboFrame *)weiboFrame {

    _weiboFrame = weiboFrame;

    //加载子控件数据
    [self loadingData];

    //设置子控件frame
    [self setWeiboFrame];
}

- (void)loadingData {

    //取出数据模型
    JFWeibo *weibo = self.weiboFrame.weibo;

    //头像
    self.iconView.image = [UIImage imageNamed:weibo.icon];

    //名字
    self.nameView.text = weibo.name;

    //vip
    if (weibo.isVip) {

        //如果是vip就取消隐藏vip图标
        self.vipView.hidden = NO;

        self.vipView.image = [UIImage imageNamed:@"vip"];
    } else {

        //不是vip就隐藏vip图标
        self.vipView.hidden = YES;
    }

    //正文
    self.textView.text = weibo.text;

    //配图
    self.pictureView.image = [UIImage imageNamed:weibo.picture];
}

- (void)setWeiboFrame {
    //头像
    self.iconView.frame = self.weiboFrame.iconFrame;

    //名字
    self.nameView.frame = self.weiboFrame.nameFrame;

    //vip
    self.vipView.frame = self.weiboFrame.vipFrame;

    //正文
    self.textView.frame = self.weiboFrame.textFrame;

    //配图
    self.pictureView.frame = self.weiboFrame.pictureFrame;
}


@end
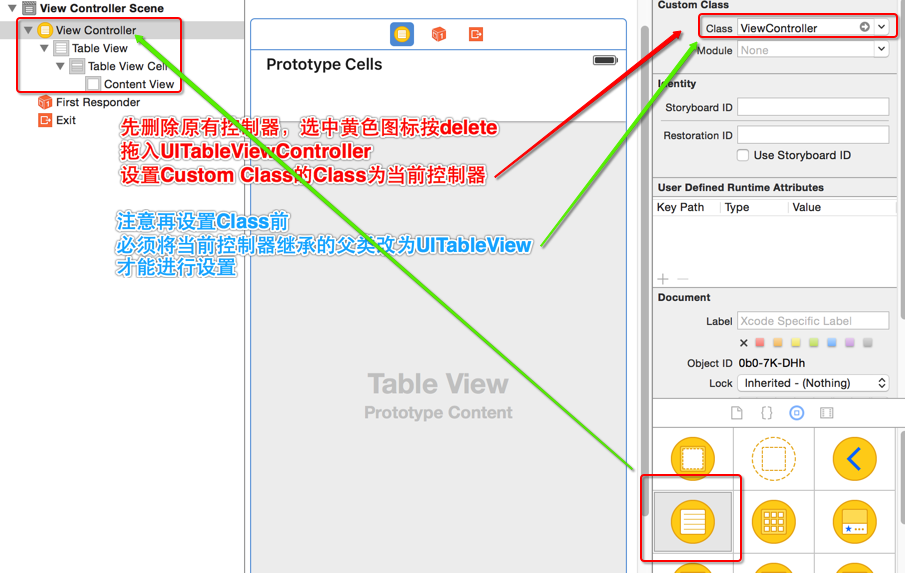
封装好cell后,我们就可以开始在控制台调用了。首先先在Main.storyboard中删除原有的控制器,拖拽一个新的控制器控件UITableViewController。这样做的好处是我们不需要手动添加UITableView数据源、代理协议,手动指定数据源、代理对象,会默认帮我们设置好这一切。
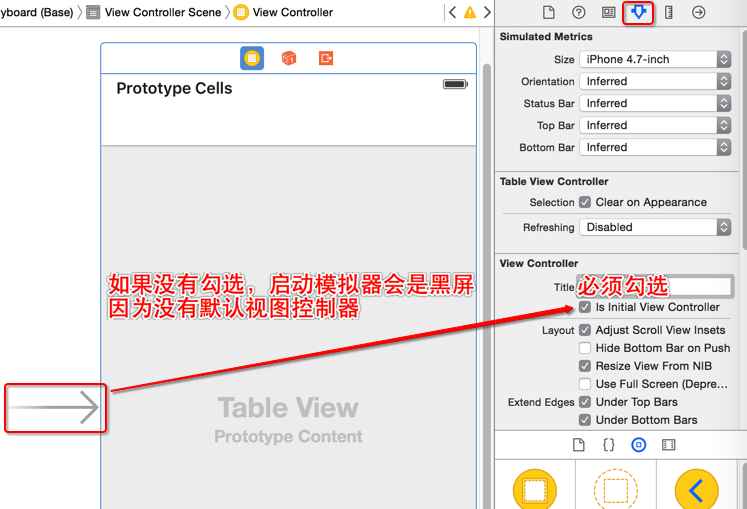
 特别注意的是:必须勾选Is initial View Controller选项,让当前控制器设为默认视图控制器,否则看不到界面。
最后在控制器中定义一个frame模型数组属性并懒加载数据,然后实现数据源方法和代理方法,创建cell并为cell赋值数据。
ViewController.m
#import "ViewController.h"
#import "JFWeiboFrame.h"
#import "JFWeiboCell.h"

@interface ViewController ()

//frame模型数组
@property (strong, nonatomic) NSArray *weiboFrames;

@end

@implementation ViewController

- (void)viewDidLoad {
    [super viewDidLoad];

}

- (void)didReceiveMemoryWarning {
    [super didReceiveMemoryWarning];
}

//隐藏状态栏
- (BOOL)prefersStatusBarHidden {
    return YES;
}

//懒加载frame模型数组
- (NSArray *)weiboFrames {
    if (_weiboFrames == nil) {

        //返回一个创建好的frame模型数组
        _weiboFrames = [JFWeiboFrame weiboFrames];
    }
    return _weiboFrames;
}

//每组多少行
- (NSInteger)tableView:(UITableView *)tableView numberOfRowsInSection:(NSInteger)section {

    //模型数组有多少个元素就有多少行
    return self.weiboFrames.count;
}

//创建cell
- (UITableViewCell *)tableView:(UITableView *)tableView cellForRowAtIndexPath:(NSIndexPath *)indexPath {

    //获取模型对象
    JFWeiboFrame *weiboFrame = self.weiboFrames[indexPath.row];

    //创建cell
    JFWeiboCell *cell = [JFWeiboCell weiboCell:tableView];

    //为cell赋值
    cell.weiboFrame = weiboFrame;

    return cell;

}

//返回cell行高
- (CGFloat)tableView:(UITableView *)tableView heightForRowAtIndexPath:(NSIndexPath *)indexPath {

    //获取模型对象
    JFWeiboFrame *weiboFrame = self.weiboFrames[indexPath.row];

    return weiboFrame.cellHeight;
}

@end
案例易错总结:
1.创建cell的子控件是在重写initWithStyle:reuseIdentifier:方法中创建。
2.封装frame模型的意义就是为了计算cell的高度,因为设置高度的代理方法优先级高于创建cell的数据源方法。
3.使用UITableViewController控制器,可以节省我们遵循协议、指定代理的步骤。
