学习目标
1.【掌握】UIPickerView简介
2.【理解】UIPickerView显示字符串
3.【理解】UIPickerView显示自定义View
4.【掌握】UIDatePicker简介
5.【掌握】UIPickerView基本使用方法
6.【了解】项目中的常见文件
7.【理解】App启动原理
一、UIPickerView简介
UIPickerView也是一个iOS开发中常用的控件,适用于让用户选择少量数据,比如设置出生日期、城市、国家等。UIPickerView在iOS6和iOS7后的风格有所改变,之前是拟物化,现在变为扁平化了。他的用法和我们之前学习的UITableView类似,都需要用到数据源和代理来显示数据和监听事件。
//1.UIPickerView的常见属性
// 数据源(用来告诉UIPickerView有多少列多少行)
@property(nonatomic,assign) id<UIPickerViewDataSource> dataSource;
// 代理(用来告诉UIPickerView每1列的每1行显示什么内容,监听UIPickerView的选择)
@property(nonatomic,assign) id<UIPickerViewDelegate> delegate;
// 是否要显示选中的指示器
@property(nonatomic) BOOL showsSelectionIndicator;
// 一共有多少列
@property(nonatomic,readonly) NSInteger numberOfComponents;

//2.UIPickerView的常见方法
// 重新刷新所有列
- (void)reloadAllComponents;
// 重新刷新第component列
- (void)reloadComponent:(NSInteger)component;

// 主动选中第component列的第row行
- (void)selectRow:(NSInteger)row inComponent:(NSInteger)component animated:(BOOL)animated;

// 获得第component列的当前选中的行号
- (NSInteger)selectedRowInComponent:(NSInteger)component;

//3.数据源方法(UIPickerViewDataSource)
//  一共有多少列
- (NSInteger)numberOfComponentsInPickerView:(UIPickerView *)pickerView;
//  第component列一共有多少行
- (NSInteger)pickerView:(UIPickerView *)pickerView numberOfRowsInComponent:(NSInteger)component;

//4.代理方法(UIPickerViewDelegate)
//  第component列的宽度是多少
- (CGFloat)pickerView:(UIPickerView *)pickerView widthForComponent:(NSInteger)component;
//  第component列的行高是多少
- (CGFloat)pickerView:(UIPickerView *)pickerView rowHeightForComponent:(NSInteger)component;

//  第component列第row行显示什么文字
- (NSString *)pickerView:(UIPickerView *)pickerView titleForRow:(NSInteger)row forComponent:(NSInteger)component;

//  第component列第row行显示怎样的view(内容)
- (UIView *)pickerView:(UIPickerView *)pickerView viewForRow:(NSInteger)row forComponent:(NSInteger)component reusingView:(UIView *)view;

//  选中了pickerView的第component列第row行
- (void)pickerView:(UIPickerView *)pickerView didSelectRow:(NSInteger)row inComponent:(NSInteger)component;
UIPickerView的注意点
1.在ios8之前,UIPickerView的高度是(162)固定的,不能被修改。在 ios8后,它的高度就可以修改了。
2.下面这个方法的重用 view 在 ios6之后就一直为空。如果需要适配 ios6之前的系统,为了性能考虑,应该将这个 view 利用起来。
//重用View在iOS6之前才有效
- (UIView *)pickerView:(UIPickerView *)pickerView viewForRow:(NSInteger)row forComponent:(NSInteger)component reusingView:(UIView *)view;
pickerView的高度设置
如果没有主动设置高度,或者设置为0。则高度默认值216
如果设置的高度大于0且小于180,则高度默认值162
如果设置的高度大于等于180且小于216,怎么高度默认值为180
pickerView 的宽度设置
初始化时没有给定宽度,或者给定的宽度为0,则宽度默认等于屏幕的宽度。
给定了一个不为大于0的宽度,则宽度就等于给定的值。
二、UIPickerView显示字符串
UIPickerView可以显示纯文字,也能显示自定义View。我们用一个简单的案例来演示UIPickerView的基本使用方法,需求是实现滚动选择数据,并将选中的数据赋值给指定的控件,并提供一个随机选择的方法。最终效果图如下所示:
首先我们直接在Main.storyboard中搭建界面,由于只是演示,我就只做了UIPickerView的适配。
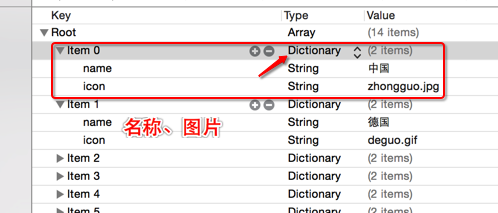
我们将选择器中所要展示的数据存储在plist文件中了,并且没有用到字典,所以无需封装模型直接先懒加载数据存储到一个数组中即可。
ViewController.m
#import "ViewController.h"

@interface ViewController () <UIPickerViewDataSource,UIPickerViewDelegate>

//UIPickerView控件
@property (weak, nonatomic) IBOutlet UIPickerView *pickerView;

//用于显示数据的Label
@property (weak, nonatomic) IBOutlet UILabel *categoriesLbl;
@property (weak, nonatomic) IBOutlet UILabel *timeLbl;
@property (weak, nonatomic) IBOutlet UILabel *constellationLbl;

//存储从plist加载进来的数据的数组
@property (strong, nonatomic) NSArray *filterArray;

//随机选择数据的方法
- (IBAction)randomSelect;
@end

@implementation ViewController

- (void)viewDidLoad {
    [super viewDidLoad];

    //设置UIPickerView的数据源、代理
    self.pickerView.dataSource = self;
    self.pickerView.delegate = self;

    //默认选中每列的第一行
    for (NSInteger component = 0; component < self.filterArray.count; component++) {
        [self pickerView:nil didSelectRow:0 inComponent:component];
    }
}

//懒加载
-(NSArray *)filterArray {
    if (!_filterArray) {
        //从plist文件中加载数据
        _filterArray = [NSArray arrayWithContentsOfFile:[[NSBundle mainBundle] pathForResource:@"filter.plist" ofType:nil]];
    }
    return _filterArray;
}

//随机选择
- (IBAction)randomSelect {

    for (NSInteger component = 0; component < self.filterArray.count; component++) {

        //取出第component列的子数组的count
        NSInteger count = [self.filterArray[component] count];

        //返回第component列中选中的行
        NSInteger currentSelectedRow = [self.pickerView selectedRowInComponent:component];

        //假设随机生成的行和当前行相等
        NSInteger randomRow = currentSelectedRow;

        //随机生成一个和当前选中行不同的行号
        if (randomRow == currentSelectedRow) {
            randomRow = arc4random_uniform((u_int32_t)count);
        }

        //主动选中数据
        [self.pickerView selectRow:randomRow inComponent:component animated:YES];

        //手动调用这个方法,将选中的数据赋值给Label
        [self pickerView:self.pickerView didSelectRow:randomRow inComponent:component];

    }
}

//返回一共多少列
- (NSInteger)numberOfComponentsInPickerView:(UIPickerView *)pickerView {
    return self.filterArray.count;
}

//返回component列的行数
- (NSInteger)pickerView:(UIPickerView *)pickerView numberOfRowsInComponent:(NSInteger)component {
    return [self.filterArray[component] count];
}

//返回component列的row行的title
- (NSString *)pickerView:(UIPickerView *)pickerView titleForRow:(NSInteger)row forComponent:(NSInteger)component {
    return self.filterArray[component][row];
}

//当选中component列的row行时调用
- (void)pickerView:(UIPickerView *)pickerView didSelectRow:(NSInteger)row inComponent:(NSInteger)component {

    NSArray *date = self.filterArray[component];
    NSString *title = date[row];

    //将选中的数据赋值给对应的Label
    if (component == 0) {
        self.categoriesLbl.text = title;
    } else if (component == 1) {
        self.timeLbl.text = title;
    } else if (component == 2) {
        self.constellationLbl.text = title;
    }
}

@end
三、UIPickerView显示自定义View
用一个国旗选择的案例来演示如何让UIPickerView显示的数据是自定义View而不是纯字符串,其实和上面的案例区别不大,只是换了一个返回每列、每行数据如何显示的代理方法。上面案例是直接返回字符串,这里我们需要返回一个自定义View而已。下图是我们的需求:
首先创建项目导入plist文件,数据是以字典形式存储的,所以我们需要封装模型。
JFFlag.h
#import <Foundation/Foundation.h>

@interface JFFlag : NSObject
//国旗名称
@property (copy, nonatomic) NSString *name;

//国旗图片
@property (copy, nonatomic) NSString *icon;

//快速创建模型
- (instancetype)initWithDictionary:(NSDictionary *)dict;
+ (instancetype)flagWithDictyinary:(NSDictionary *)dict;

//返回模型数组
+ (NSArray *)flags;
@end
JFFlag.m
#import "JFFlag.h"

@implementation JFFlag

//快速创建模型
- (instancetype)initWithDictionary:(NSDictionary *)dict {
    if (self = [super init]) {
        [self setValuesForKeysWithDictionary:dict];
    }
    return self;
}
+ (instancetype)flagWithDictyinary:(NSDictionary *)dict {
    return [[self alloc] initWithDictionary:dict];
}

//返回模型数组
+ (NSArray *)flags {
    NSArray *array = [NSArray arrayWithContentsOfFile:[[NSBundle mainBundle] pathForResource:@"flags.plist" ofType:nil]];

    NSMutableArray *arrayM = [NSMutableArray array];
    for (NSDictionary *dict in array) {
        JFFlag *flag = [JFFlag flagWithDictyinary:dict];
        [arrayM addObject:flag];
    }
    return arrayM;
}
@end
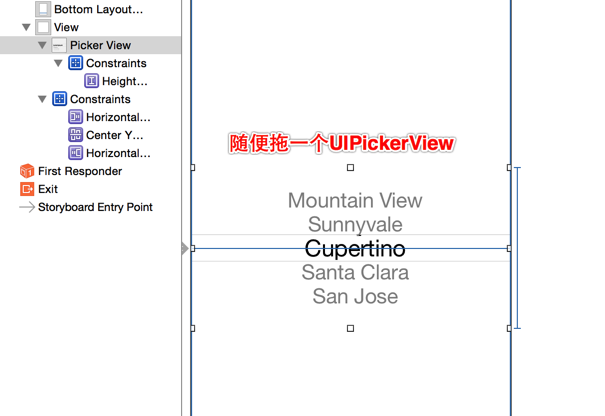
在Main.storyboard中搭建界面,这里我们只需要拖拽一个UIPickerView控件即可。
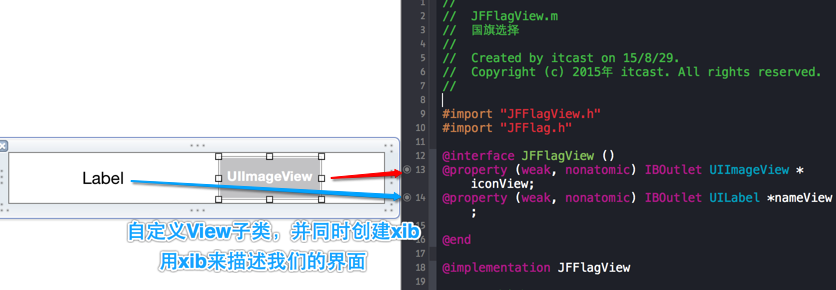
UIPickerView显示的自定义View,也就是类似于我们之前学过的UITableViewCell。这里我们也单独封装自定义View,并用xib来描述这个View,并进行属性连线。
然后实现封装类中的方法,提供一个快速创建自定义View的类方法和为自定义View的子控件赋值的方法。
JFFlagView.h
#import <UIKit/UIKit.h>
#import "JFFlag.h"

@interface JFFlagView : UIView
@property (strong, nonatomic) JFFlag *flag;

//快速创建自定义View
+ (instancetype)flagView;
@end
JFFlagView.m
#import "JFFlagView.h"
#import "JFFlag.h"

@interface JFFlagView ()
@property (weak, nonatomic) IBOutlet UIImageView *iconView;
@property (weak, nonatomic) IBOutlet UILabel *nameView;

@end

@implementation JFFlagView

//快速创建自定义View
+ (instancetype)flagView {
    //从xib重创建View
    return [[[NSBundle mainBundle] loadNibNamed:@"JFFlagView" owner:nil options:nil] lastObject];
}

//重写set方法为自定义View中的子控件赋值
- (void)setFlag:(JFFlag *)flag {
    _flag = flag;

    self.iconView.image = [UIImage imageNamed:flag.icon];
    self.nameView.text = flag.name;
}
@end
最后我们在控制器中懒加载数据,并实现UIPickerView的数据源和代理方法,进行数据的展示。
ViewController.m
#import "ViewController.h"
#import "JFFlag.h"
#import "JFFlagView.h"

@interface ViewController () <UIPickerViewDataSource,UIPickerViewDelegate>
@property (strong, nonatomic) NSArray *flags;
@property (weak, nonatomic) IBOutlet UIPickerView *pickerView;

@end

@implementation ViewController

- (void)viewDidLoad {
    [super viewDidLoad];

    //指定数据源和代理对象
    self.pickerView.dataSource = self;
    self.pickerView.delegate = self;
}

//懒加载
- (NSArray *)flags {
    if (_flags == nil) {
        _flags = [JFFlag flags];
    }
    return _flags;
}

//一共有多少列数据,注意和UITableView不同的是,就算是只有一列,这个方法也不能省略
- (NSInteger)numberOfComponentsInPickerView:(UIPickerView *)pickerView {
    return 1;
}

//每组有多少行
- (NSInteger)pickerView:(UIPickerView *)pickerView numberOfRowsInComponent:(NSInteger)component {
    return self.flags.count;
}

//返回每行的View
- (UIView *)pickerView:(UIPickerView *)pickerView viewForRow:(NSInteger)row forComponent:(NSInteger)component reusingView:(UIView *)view {

    JFFlag *flag = self.flags[row];

    //创建自定义View并赋值数据
    JFFlagView *flagView = [JFFlagView flagView];
    flagView.flag = flag;

    return flagView;
}

//返回第componet列的行高
- (CGFloat)pickerView:(UIPickerView *)pickerView rowHeightForComponent:(NSInteger)component {
    return 50;
}

@end
注意:在iOS6之后,返回的View就不能重用了,因为苹果觉得UIPickerView展示的数据量都非常小,没有必须重用。如果是在iOS6之前,也可以重用View。
四、UIDatePicker
UIDatePicker是一个日期选择器控件,他的用法和UIPickerView类似。UIDatePicker继承自UIControl,所以可以添加监听事件。但是有些童鞋认为UIDatePicker是UIPickerView的子类,事实不是这样的,只是在UIDatePicker内部封装了一个UIPickerView,所以不要弄错了啊。并且UIDatePicker控件经常和UIToolBar一起使用,也就是给日期选择器添加一个工具条。
//1.常见属性
// datePicker的显示模式
@property (nonatomic) UIDatePickerMode datePickerMode;
// 显示的区域语言
@property (nonatomic, retain) NSLocale   *locale;

//2.监听UIDatePicker的选择
* 因为UIDatePicker继承自UIControl,所以通过addTarget:...监听

//3.代码创建UIDatePicker
// 1.创建日期选择器
UIDatePicker *datePicker = [[UIDatePicker alloc] init];
// 2.设置日期显示区域
datePicker.locale = [NSLocale localeWithLocaleIdentifier:@"zh"];
// 3.设置日期模式
datePicker.datePickerMode = UIDatePickerModeTime;
// 4.0 设置最小时间(从当前时间起的前20年)
datePicker.minimumDate = [NSDate dateWithTimeIntervalSinceNow:-(365 * 24 * 3600 * 20)];
// 4.1 设置最大时间(从当前时间起的后20年)
datePicker.maximumDate = [NSDate dateWithTimeIntervalSinceNow:365 * 24 * 3600 * 20];
// 5.设置时间间隔。(该间隔要能够让60整除)
datePicker.minuteInterval = 6;
五、UIPickerView基本使用方法
使用UIDatePicker和UIPickerView完成选择生日和省份的功能,自定义键盘其实就是为UITextField的inputView赋值一个自定义View,工具条则是为UITextField的inputAccessoryView赋值一个自定义的View。
自定义UITextField弹出的键盘:
这里第一个文本框的inputView赋值一个UIDatePicker,inputAccessoryView则是一个UIToolBar。
第二个文本框的inputView赋值一个UIPickerView,inputAccessoryView也是一个UIToolBar。
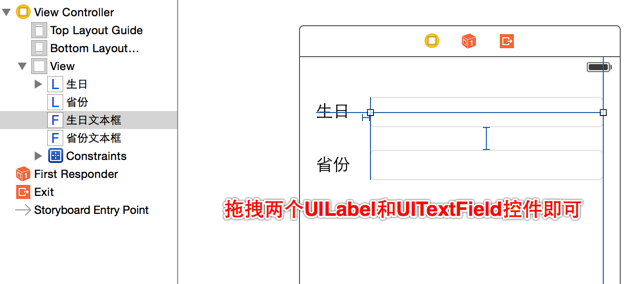
创建项目,在storyboard中搭建界面,这里只需要拖拽两个UILabel和UITextField即可,其他控件需要代码创建 。
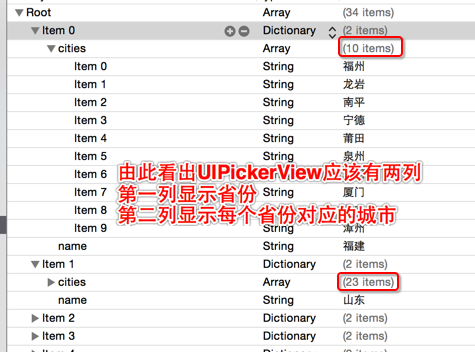
搭建好界面先来创建模型,导入plist文件观察可轻易发现数据的结构。每一个字典中有两个键值对,一个是城市数组,另一个是省份字符串。由此可以确定,UIPickerView的第一列显示的数据就是所有省份,第二列显示的数据则是每个省份对应的城市,而不是固定的数据。
字典转模型,返回模型数组。已经写了无数遍了,就不再解释了。提供一个返回模型数组的类方法,方便懒加载时直接调用这个类方法返回模型数组。
Province.h
#import <Foundation/Foundation.h>

@interface Province : NSObject
@property(nonatomic,strong) NSArray *cities;
@property(nonatomic,copy) NSString *name;

//快速创建模型对象
+ (instancetype)provinceWithDict:(NSDictionary *)dict;
- (instancetype)initWithDict:(NSDictionary *)dict;

//返回模型数组
+ (NSArray *)provinces;
@end
Province.m
#import "Province.h"

@implementation Province
//快速创建模型对象
+ (instancetype)provinceWithDict:(NSDictionary *)dict{
    return [[self alloc] initWithDict:dict];
}
- (instancetype)initWithDict:(NSDictionary *)dict{
    if (self = [super init]) {
        [self setValuesForKeysWithDictionary:dict];
    }
    return self;
}

//返回模型数组
+ (NSArray *)provinces{
    NSArray *provinceArray = [NSArray arrayWithContentsOfFile:[[NSBundle mainBundle] pathForResource:@"cities.plist" ofType:nil]];
    NSMutableArray *provinces = [NSMutableArray array];
    for (NSDictionary *dict in provinceArray) {
        Province *province = [self provinceWithDict:dict];
        [provinces addObject:province];
    }
    return provinces;
}
@end
封装好模型后,在控制器中懒加载模型数组。并完成其他一系列调用,具体代码如下:
ViewController.m
#import "ViewController.h"
#import "Province.h"
@interface ViewController ()<UIPickerViewDataSource,UIPickerViewDelegate,UITextFieldDelegate>

//文本框控件
@property (weak, nonatomic) IBOutlet UITextField *inputField;
@property (weak, nonatomic) IBOutlet UITextField *provinceField;

//日期选择器,注意懒加载的控件需要用strong而不是weak
@property(nonatomic,strong) UIDatePicker *datePicker;

//工具导航控件,注意懒加载的控件需要用strong而不是weak
@property(nonatomic,strong) UIToolbar *toolBar;

//模型数组
@property(nonatomic,strong) NSArray *provinces;

//当前选中的省份
@property(nonatomic,strong) Province *selectedProvince;

@end

@implementation ViewController

//懒加载模型数组
- (NSArray *)provinces {
    if (_provinces == nil) {
        _provinces = [Province provinces];
    }
    return _provinces;
}

//懒加载工具条控件
- (UIToolbar *)toolBar {
    if (_toolBar == nil) {

        //创建键盘工具条
        UIToolbar *toolbar = [[UIToolbar alloc] init];
        toolbar.frame = CGRectMake(0, 0, 320, 44);
        toolbar.barTintColor = [UIColor orangeColor];
        toolbar.tintColor = [UIColor whiteColor];

        //上一个
        UIBarButtonItem *lastItem = [[UIBarButtonItem alloc] initWithTitle:@"上一个" style: UIBarButtonItemStyleDone target:self action:@selector(lastClick)];

        //下一个
        UIBarButtonItem *nextItem = [[UIBarButtonItem alloc] initWithTitle:@"下一个" style: UIBarButtonItemStyleDone target:self action:@selector(nextClick)];

        UIBarButtonItem *flexibleSpace = [[UIBarButtonItem alloc] initWithBarButtonSystemItem:UIBarButtonSystemItemFlexibleSpace target:nil action:nil];

        //完成
        UIBarButtonItem *complete = [[UIBarButtonItem alloc] initWithTitle:@"完成" style: UIBarButtonItemStyleDone target:self action:@selector( complete)];

        toolbar.items = @[lastItem,nextItem,flexibleSpace,complete];

        _toolBar = toolbar;
    }
    return _toolBar;
}

//懒加载时间选择器控件
- (UIDatePicker *)datePicker {
    if (_datePicker == nil) {

        //创建日期选择器
        UIDatePicker *datePicker = [[UIDatePicker alloc] init];
        //设置日期显示区域
        datePicker.locale = [NSLocale localeWithLocaleIdentifier:@"zh"];
        //设置日期模式
        datePicker.datePickerMode = UIDatePickerModeDate;

        //设置最小时间
        datePicker.minimumDate = [NSDate dateWithTimeIntervalSinceNow:-(365 * 24 * 3600 * 20)];
        //设置最大时间
        datePicker.maximumDate = [NSDate dateWithTimeIntervalSinceNow:365 * 24 * 3600 * 20];

        //设置时间间隔,默认为1,设置的值必须能被60整除
        datePicker.minuteInterval = 6;

        //监听工具条的点击
        [datePicker addTarget:self action:@selector(datePickerClick:) forControlEvents:UIControlEventValueChanged];
        _datePicker = datePicker;
    }
    return  _datePicker;
}

- (void)viewDidLoad {
    [super viewDidLoad];

    //设置文本输入框的代理
    self.inputField.delegate = self;
    self.provinceField.delegate = self;

    //默认显示当天日期
    [self datePickerClick:nil];
}

#pragma mark - 数据源方法
//城市选择一共有多少列
-(NSInteger)numberOfComponentsInPickerView:(UIPickerView *)pickerView {
    return  2;
}

//城市选择第component列有多少行
- (NSInteger)pickerView:(UIPickerView *)pickerView numberOfRowsInComponent:(NSInteger)component {

    if (component == 0) {
        //第一列,显示所有省份,所以就是模型数组的长度
        return self.provinces.count;
    } else {
        //获取当前第一列中选中的数据的索引
        NSInteger provinceIndex = [pickerView selectedRowInComponent:0];
        //根据这个索引获取当前选中的数据的模型对象
        Province *province = self.provinces[provinceIndex];
        //返回这个模型对象中cities属性的长度,也就是对应城市个数
        return province.cities.count;
    }
}

#pragma mark - 代理方法
//第component列的第row行显示什么数据
- (NSString *)pickerView:(UIPickerView *)pickerView titleForRow:(NSInteger)row forComponent:(NSInteger)component{
    if (component == 0) {
        //显示哪个省
        Province *province = self.provinces[row];
        return province.name;
    } else {
        //显示哪个城市
        //获取当前第一列中选中的数据的索引
        NSInteger provinceIndex = [pickerView selectedRowInComponent:0];
        //根据这个索引获取当前选中的数据的模型对象
        Province *province = self.provinces[provinceIndex];

        if (row >= province.cities.count) return nil;

        return province.cities[row];
    }
}

//选中第 component 列的第row 行
- (void)pickerView:(UIPickerView *)pickerView didSelectRow:(NSInteger)row inComponent:(NSInteger)component {
    if (component == 0) {
        //改变了省份
        self.selectedProvince =  self.provinces[row];

        //刷新第1列的数据(重新刷新数据,重新调用数据源和代理的相应方法获得数据)
        [pickerView reloadComponent:1];
        //选中第1列的第0行
        [pickerView selectRow:0 inComponent:1 animated:YES];
    }
    NSString *cityName = self.selectedProvince.cities[component == 0 ? 0:row];
    self.provinceField.text = [NSString stringWithFormat:@"%@  %@",self.selectedProvince.name,cityName];
}


#pragma mark - 监听按钮的点击事件
//完成按钮
- (void)complete{
    //确保用户是选中了省份的
    if ([self.provinceField isFirstResponder] && self.selectedProvince && self.provinceField.text.length == 0) {
        self.provinceField.text = [NSString stringWithFormat:@"%@  %@",self.selectedProvince.name,self.selectedProvince.cities[0]];
    }

    [self.view endEditing:YES];

}
//上一个按钮
- (void)lastClick{
    if (self.provinceField.isFirstResponder) {
        [self.inputField becomeFirstResponder];
    }
}
//下一个按钮
- (void)nextClick{
    if (self.inputField.isFirstResponder) {
        [self.provinceField becomeFirstResponder];
    }
}

#pragma mark - 监听日期选择器时间的改变
- (void)datePickerClick:(UIDatePicker *)datePicker{

    //获取NSDate对象
    NSDate *date = datePicker == nil ? [NSDate date]:[datePicker date];

    //创建时间格式化对象
    NSDateFormatter *formatter = [[NSDateFormatter alloc] init];

    //指定时间格式
    formatter.dateFormat = @"yyyy-MM-dd";

    //将时间赋值给文本框
    self.inputField.text = [formatter stringFromDate:date];
}

#pragma mark - 文本输入框代理
- (BOOL)textFieldShouldBeginEditing:(UITextField *)textField {

    if(textField.inputView) return YES;

    if (textField == self.inputField) {

        //自定义生日文本输入框的键盘
        self.inputField.inputView = self.datePicker;
        //给键盘添加配置工具条
        self.inputField.inputAccessoryView = self.toolBar;

    } else if(textField == self.provinceField) {

        //默认被选中的省份为数组中的一个省份
        self.selectedProvince = self.provinces[0];

        //自定义省份文本输入框的键盘
        UIPickerView *pickerView = [[UIPickerView alloc] init];

        //指定数据源、代理对象
        pickerView.dataSource = self;
        pickerView.delegate = self;

        //自定义省份输入框的键盘
        self.provinceField.inputView = pickerView;
        //给键盘添加配置工具条
        self.provinceField.inputAccessoryView = self.toolBar;
    }
    return YES;
}
@end
六、项目中的常见文件
Info.plist是整个项目的重要配置文件不能删除。
Localization native development region :本地化相关。
Bundle display name :程序安装后显示在iphone/ipad上的名字。
Icon file :程序的图标,Xcode5以前创建的项目有,一般用Icon.png,Xcode5以后创建的不在plist设置,在Images.xcassets设置。
Bundle version :程序版本号,AppStore每更新版本,版本要增加,内部项目管理的版本号,不对外。
Bundle versions string, short :用于itunes上显示的版本号,即对外的版本。一般3个数组成。
Bundle identifier :应用的惟一标识,发布到AppStore去。
pch文件干什么用?
pch文件里的内容被项目中的其它所有资源共享访问,定义宏 身高、电话和其它文件共享使用、自定义日志输出。我们在开发阶段,在pch中使用DEBUG模式自定义日志输出宏,当app发布后这些宏就失效。
#ifdef DEBUG //开发阶段
#define Log(...) NSLog(__VA_ARGS__)
#else //发布阶段
#define Log(...)
#endif
因为pch中的内容会呗项目中其它所有资源共享访问,所以有可能我们项目中不只是有oc文件,还会有其它语言文件。所以我们在定义被共享的内容时,应该加判断。
#ifdef __OBJC__
//这里的内容是只有.m、.mm文件中才能访问
#endif
注意:一般公用的资源写在#ifdef __OBJC__里面。
七、App启动原理
UIApplication
什么是UIApplication?
1.UIApplication是整个应用程序的象征,就像中国的象征是五星红旗。
2.每一个应用都有自己的UIApplication,而且是单例,通过[UIApplication sharedApplication]获取。单例对象也就是程序运行到结束,只能有一个对象。如果我们使用[[UIApplication alloc] init]创建对象,程序不被允许并且会直接报错,因为application只有能一个对象。
3.ios程序启动后创建的第一人对象就是UIApplication对象。
UIApplication用来用来设置全局性的东西
设置网络请求状态/取消网络请求状态
[UIApplication sharedApplication].networkActivityIndicatorVisible = YES;
设置应用图标数字/清除图标数据
[UIApplication sharedApplication].applicationIconBadgeNumber = 2;
不过在iOS8更新后不能直接这样设置应用图标的数字了,需要先获得用户的授权,才能显示。完成代码如下:
    //创建单例对象
    UIApplication *app = [UIApplication sharedApplication];

    //判断系统版本是否超过8.0
    if ([[[UIDevice currentDevice] systemVersion] doubleValue] >= 8.0) {
        //如果超过就要获取用户的授权
        UIUserNotificationSettings *settings = [UIUserNotificationSettings settingsForTypes:UIUserNotificationTypeBadge categories:nil];
        [[UIApplication sharedApplication] registerUserNotificationSettings:settings];
    }
    //设置数字
    app.applicationIconBadgeNumber = 10;
设置状态栏样式
方式1.由控制器的一个方法决定
- (UIStatusBarStyle)preferredStatusBarStyle;
方式2.使用application设置
[UIApplication sharedApplication].statusBarStyle = UIStatusBarStyleLightContent;
但是这样设置默认是不起作用的,因为默认状态栏样由控制器来管理,如果想用application设置状态栏有效,得在Info.plist的设置View controller-based status bar appearance = NO。
打电话、发短信、发邮件、打开网站
调用application的openURL方法即可,这里就只演示打开网站,其他同理。
[[UIApplication sharedApplication] openURL:[NSURL URLWithString:@"mailto://1012@qq.com"]];
UIWindow
什么是UIWindow?
1.UIWindow是用来显示控制器的View的。
2.每一个应用程序都有一个窗口。
演示UIWindow,在没有设置主要storyboard的情况下
首先在info.plist文件中清空Main storyboard file base name的value。

在AppDelegate.m文件中的didFinishLaunchingWithOptions方法中创建窗口,设置为主窗口并可见。
- (BOOL)application:(UIApplication *)application didFinishLaunchingWithOptions:(NSDictionary *)launchOptions {

    //创建窗口
    UIWindow *window = [[UIWindow alloc] initWithFrame:[UIScreen mainScreen].bounds];

    //设置颜色
    window.backgroundColor = [UIColor purpleColor];

    //窗口为什么要有根控制器,是因为窗口上要显示视图
    UIViewController *vc = [[UIViewController alloc] init];
    vc.view.backgroundColor = [UIColor grayColor];

    window.rootViewController = vc;
    //这一步内部其实是添加控制器的view到窗口上
    //[window addSubview:vc.view]

    //窗口显示的时候,一定要设置为主窗口并可见
    [window makeKeyAndVisible];

    self.window = window;

    return YES;
}
效果如下:
窗口是一个特殊的UIView对象,可以往window添加子控件,如label、switch等等。但是一般不会在窗口添加子控件,会设置窗口的rootViewController属性,将控制器的view添加到窗口上。
注意:如果直接把控制器的view添加到窗口是不能让控制的view进行旋转的,但设置窗口的根控制器,控制器的view可以旋转。因为旋转事件传递是由UIApplication -> UIWindow -> 根控制器,窗口不会做旋转处理,只有控制器才会。所以别直接将UIView添加到UIWindow上面。
获取主窗口方式
一个窗口当前能接受键盘和非触摸事件时,便被认为是主窗口。还有下面三种方式都能获取主窗口:
[UIApplication sharedApplication].delegate.window
[UIApplication sharedApplication].keyWindow
self.view.window
上面的情况是在info.plist中没有指定主要的storyboard,才需要手动创建UIWindow,并创建控制器赋值给UIWindows的rootViewController属性,再设置UIWindow为主窗口并显示。
还有一种情况就是在已经在info.plist中指定了主要的storyboard,这样程序会自动创建窗口,设置窗口的根控制器为storyboard的控制器,让窗口成为主窗口并显示。
App启动原理
我们从第一天开始学习C语言就知道,程序是入口是main函数,OC也不例外!所以程序运行首先执行main函数,main函数就一行代码,不过这一行代码可做了不少事情,main函数如下:
int main(int argc, char * argv[]) {
    @autoreleasepool {
        return UIApplicationMain(argc, argv, nil, NSStringFromClass([AppDelegate class]));
    }
}
1.程序运行后根据main函数中第三个参数创建UIApplication对象,UIApplication是程序中创建的第一个对象。这个参数如果为nil默认就是UIApplication,如果换成我们自己创建的类,就必须继承自UIApplication。
2.根据main函数中第四个参数创建UIApplication的代理对象,并赋值给UIApplication对象的delegate属性,并开启Main Runloop(事件循环)。
3.进行事件的处理,首先会在程序启动完毕后调用delegate对象的application:didFinishLaunchingWithOptions:方法。此时要分两种情况进行处理了,首先会去info.plist文件中查找是否设置了主要的storyboard文件名。
如果没有设置storyboard:我们需要手动在AppDelegate.m中的application:didFinishLaunchingWithOptions:中创建UIWindow,然后创建和设置UIWindow的rootViewController。最后设置UIWindow为主窗口并可见。
已经设置storyboard:根据Info.plist获得最主要storyboard的文件名,加载最主要的storyboard。自动创建UIWindow,自动创建和设置UIWindow的rootViewController为当前storyboard的控制器(再次提醒:这一步其实是将rootViewController中控制器的view添加到窗口上显示)。最后设置UIWindow为主窗口并可见。


